转载请注明出处:https://hts0000.github.io/
欢迎与我联系:hts_0000@sina.com
Prometheus介绍
开源的监控和告警工具,2016年加入CNCF,是继Kubernetes之后第二个CNCF托管的项目。
Prometheus收集和存储称为Metrics(指标)的时序数据,Metrics由记录时的时间戳和可选的key-value pair(称之为labels)组成。
Prometheus主要特性:
metrics Name和key-value pair实现的多维数据时间序列- 使用
PromQL语言来查询这个多维时间序列
- 不依赖分布式存储
- 通过
HTTP实现拉取(pull)时序数据
- 通过中间网关实现
推送(push)时序数据
- 通过服务发现或静态配置获取目标端
- 支持丰富的制图方式,自带数据看板
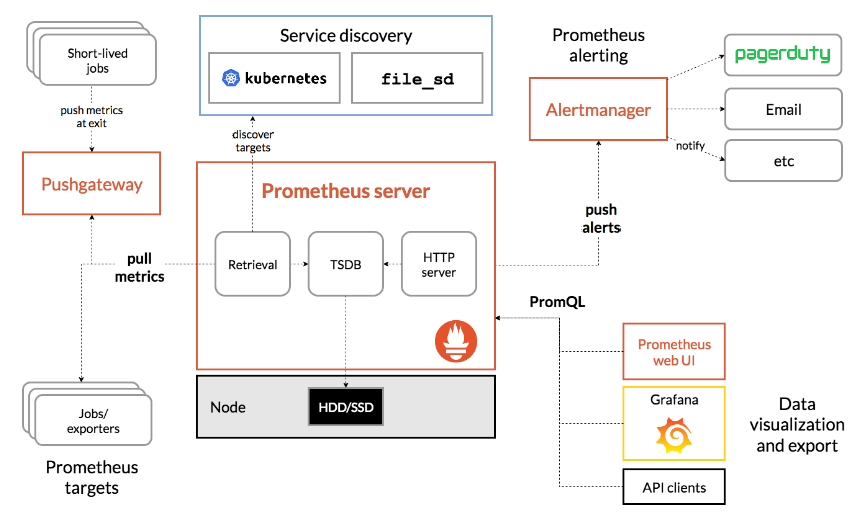
Prometheus架构图:

Metrics介绍
Metrics由两部分组成,Metrics名称和用大括号包围的多个key-value pair组成的多维数据,也叫labels。
Metrics格式:<metric name>{<label name>=<label value>, ...}
比如想存储应用各个接口调用的次数,可以使用以下命名和labels,表示请求的方法和路由。
api_http_requests_total{method="POST", handler="/messages"}
四种指标类型
- Counter:只增不减的计数器,常用于存储HTTP请求总数/PV/UV等单调递增的指标
- Gauge:可增可减的仪表盘,侧重于反应系统的当前状态,常用于存储可用内存/可用连接数等
- Histogram和Summary:主用用于统计和分析样本的分布情况
Counter
Counter计数器在重启时会重置,但是Prometheus假设这个值是递增的,因此会拿到上一次落盘时存储的值,在这个值的基础上累加。
Gauge
Histogram
Summary
PromQL介绍
PromQL是Prometheus内置的查询语言,用来选择、查询、计算、聚合时间序列数据,Prometheus的可视化和可视化都是基于PromQL来实现的。
PromQL是一种嵌套的函数式语言,要查找的数据由多层嵌套的表达式组成:
 1
 2
 3
 4
 5
 6
 7
 8
 9
10
11
|
histogram_quantile(  # 查询的根,最终结果表示一个近似分位数。
  0.9,  # histogram_quantile() 的第一个参数,分位数的目标值
  # histogram_quantile() 的第二个参数,聚合的直方图
  sum by(le, method, path) (
    # sum() 的参数,直方图过去5分钟每秒增量。
    rate(
      # rate() 的参数,过去5分钟的原始直方图序列
      demo_api_request_duration_seconds_bucket{job="demo"}[5m]
    )
  )
)
|
每个表达式执行的结果只会是以下四种类型中的一种:
- 字符串(string)
- 标量(scalar)
- 瞬时向量(instant vector)
- 区间向量(range vector)
其中瞬时向量,是一组时间序列中每条时间序列的最新的值,执行结果为每一条时间序列对应单个值。
下图展示的结果为promhttp_metric_handler_requests_total{code="200"}这组有两条时间序列,它们分别对应一个值。

而区间向量,则是一组时间序列中每条时间序列的最新时间区间内的值,执行结果为每一条时间序列区域时间内采样的所有值,使用[<time>]指定时间区间,<time>支持y/w/d/h/m/s/ms组合使用。
下图展示promhttp_metric_handler_requests_total{code="200"}[1m30s]这组有两条时间序列,它们在[1m30s]这个区间内分别有六个值。区间内具体有多少值跟采样间隔有关,本文配置采样间隔为15s。

瞬时向量和区间向量,默认情况下都是从最近时间点开始取值,使用offset <time>可以让取值时间偏移<time>。这通常用于当前状态与历史状态做对比。
可以通过指定指标名称来选择时间序列,也可以组合指标名称和标签,或使用正则,来定位符合条件的时间序列。下面通过组合指标名和标签,查询localhost:9104的最大连接数。

除了相等匹配(=)之外,Prometheus还支持其他匹配方式:
!=:匹配不相等=~:正则匹配相等!~:正则匹配不相等
如果相对指标名做正则匹配,可以使用内置__name__的特性标签,下面查询过滤所有以mysql_global_status开头的指标。
1
|
{__name__=~"mysql_global_status.*"}
|
所有指标都有instance和job这两个标签,可以通过下面两种方法拿到所有的时间序列。
1
2
|
{job!=""}
{__name__=~".+"}
|
PromQL有很多内置函数,以下是一些常见函数的介绍:
- count(<expression>):统计符合表达式的
metric的数量
- rate(<expression>):计算区间变化率,选择区间内最后一个和第一个点
- irate(<expression>):计算区间变化率,选择区间内最后两个点
- delta(<expression>):计算区间差值,选择区间内最后一个和第一个点
- predict_linear(<expression>):通过线性回归进行预测
rate()
rate()是Prometheus中非常重要的函数,它用于计算指标在时间区间内的变化率。Counter类型指标会不断地增长,有时我们可能不关心它增长到多少,而关心它在某段时间内增长的速率,rate()就是为此准备的。
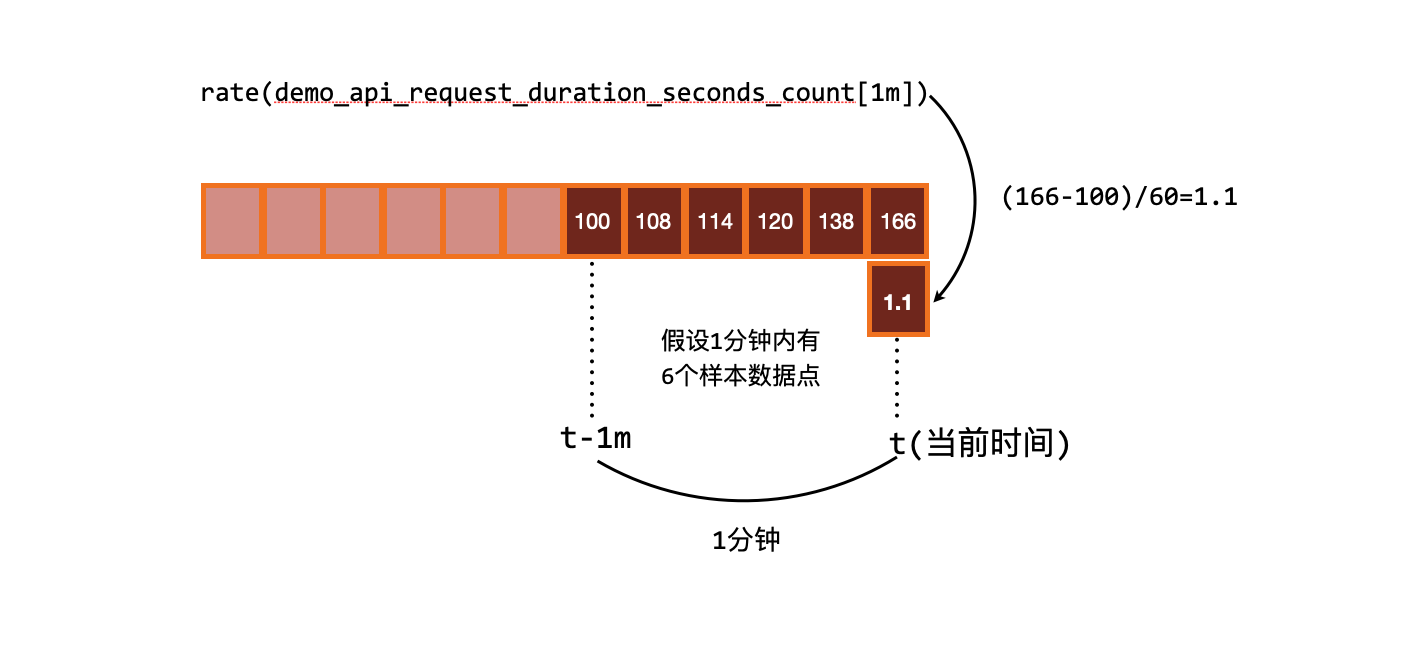
rate()接收一个区间向量,返回一个瞬时向量,返回这段区间内每秒平均变化率,公式为:(区间内最后一个采样点的值 - 区间内第一个采样点的值) / (区间内最后一个采样时间点 - 区间内第一个采样时间点)。

假设想查询Prometheus Metric页面访问成功总数在一分钟内的变化率,如下查询在Prometheus Table中得到一个瞬时向量0.06666518521810627。
1
|
rate(promhttp_metric_handler_requests_total{code="200", instance="localhost:9090"}[1m])
|

把区间向量打印出来,手动计算一下是否与rate()公式计算的结果一致。

Prometheus设置的采样间隔时间为15s,因此[1m]区间内有四个瞬时向量,代入公式计算一下:(10363 - 10360) / (1686106626.286 - 1686106581.286) = 0.0666666666666667,符合rate()计算结果。
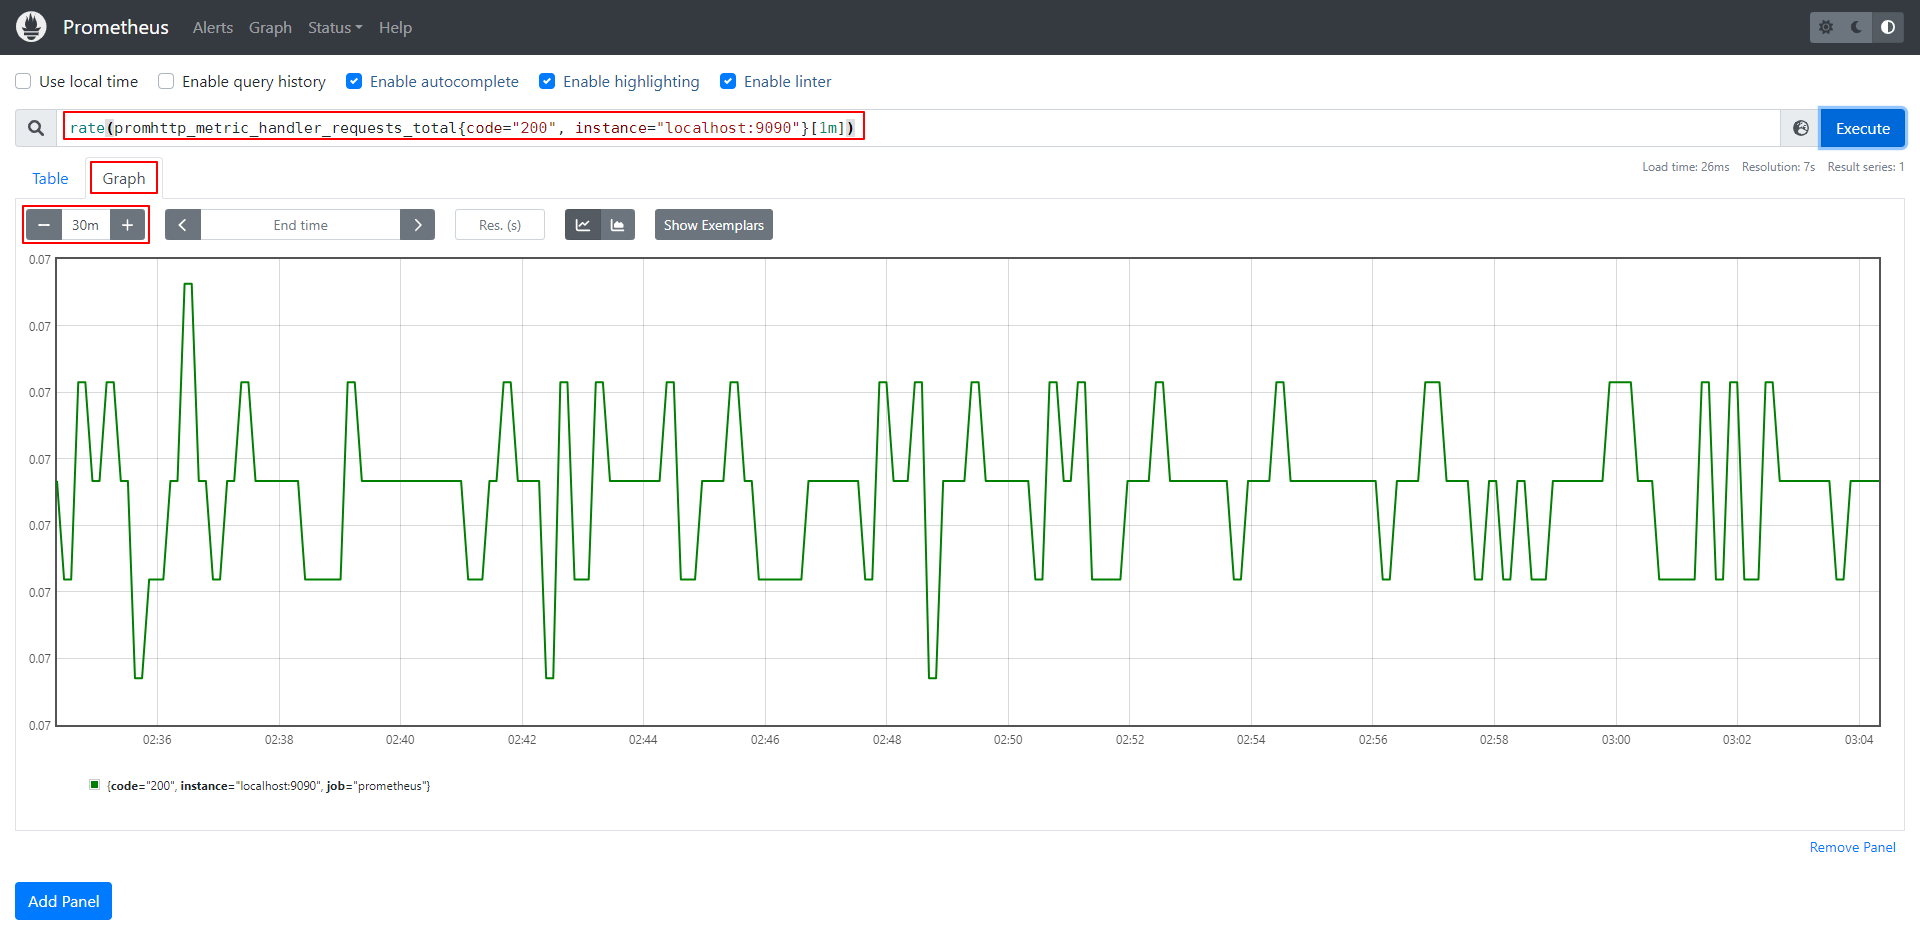
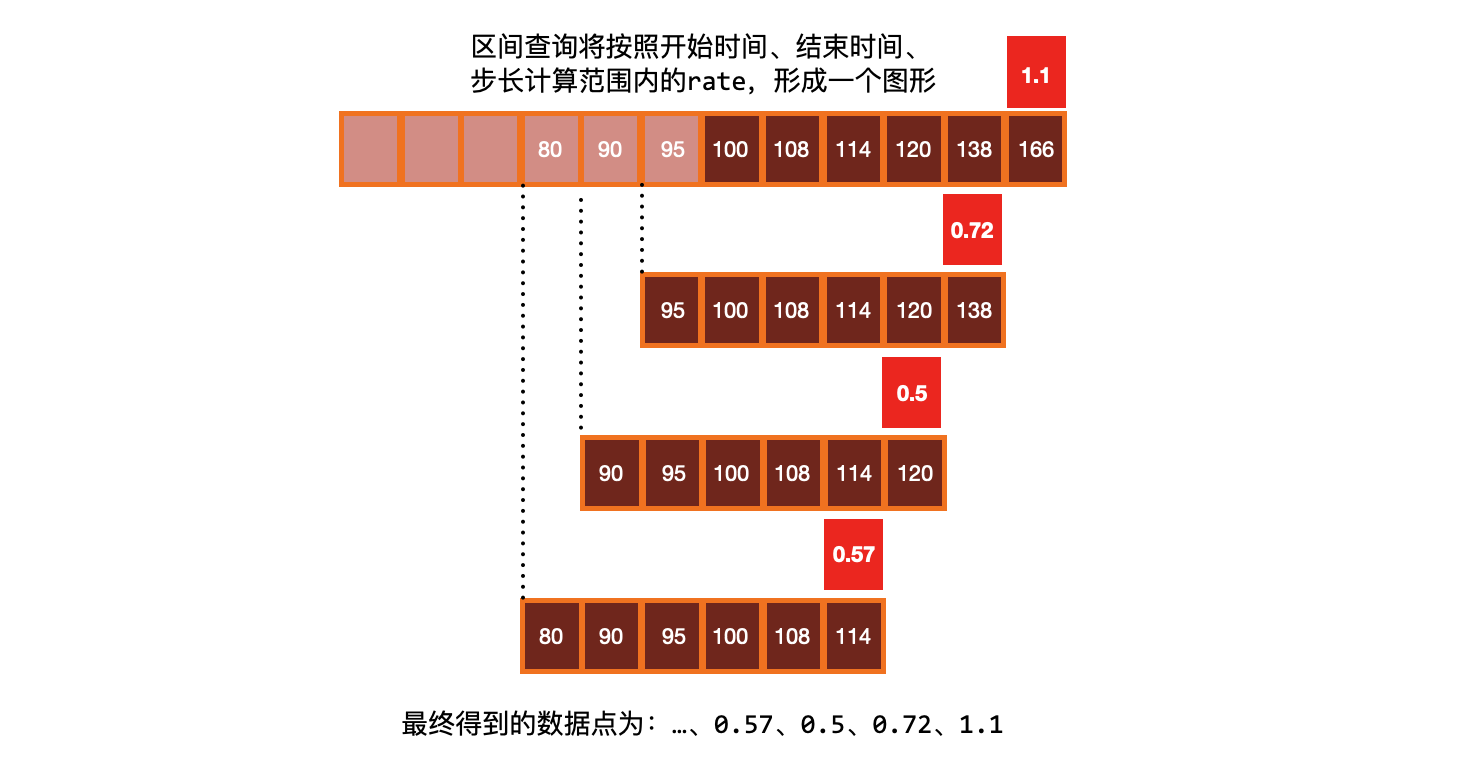
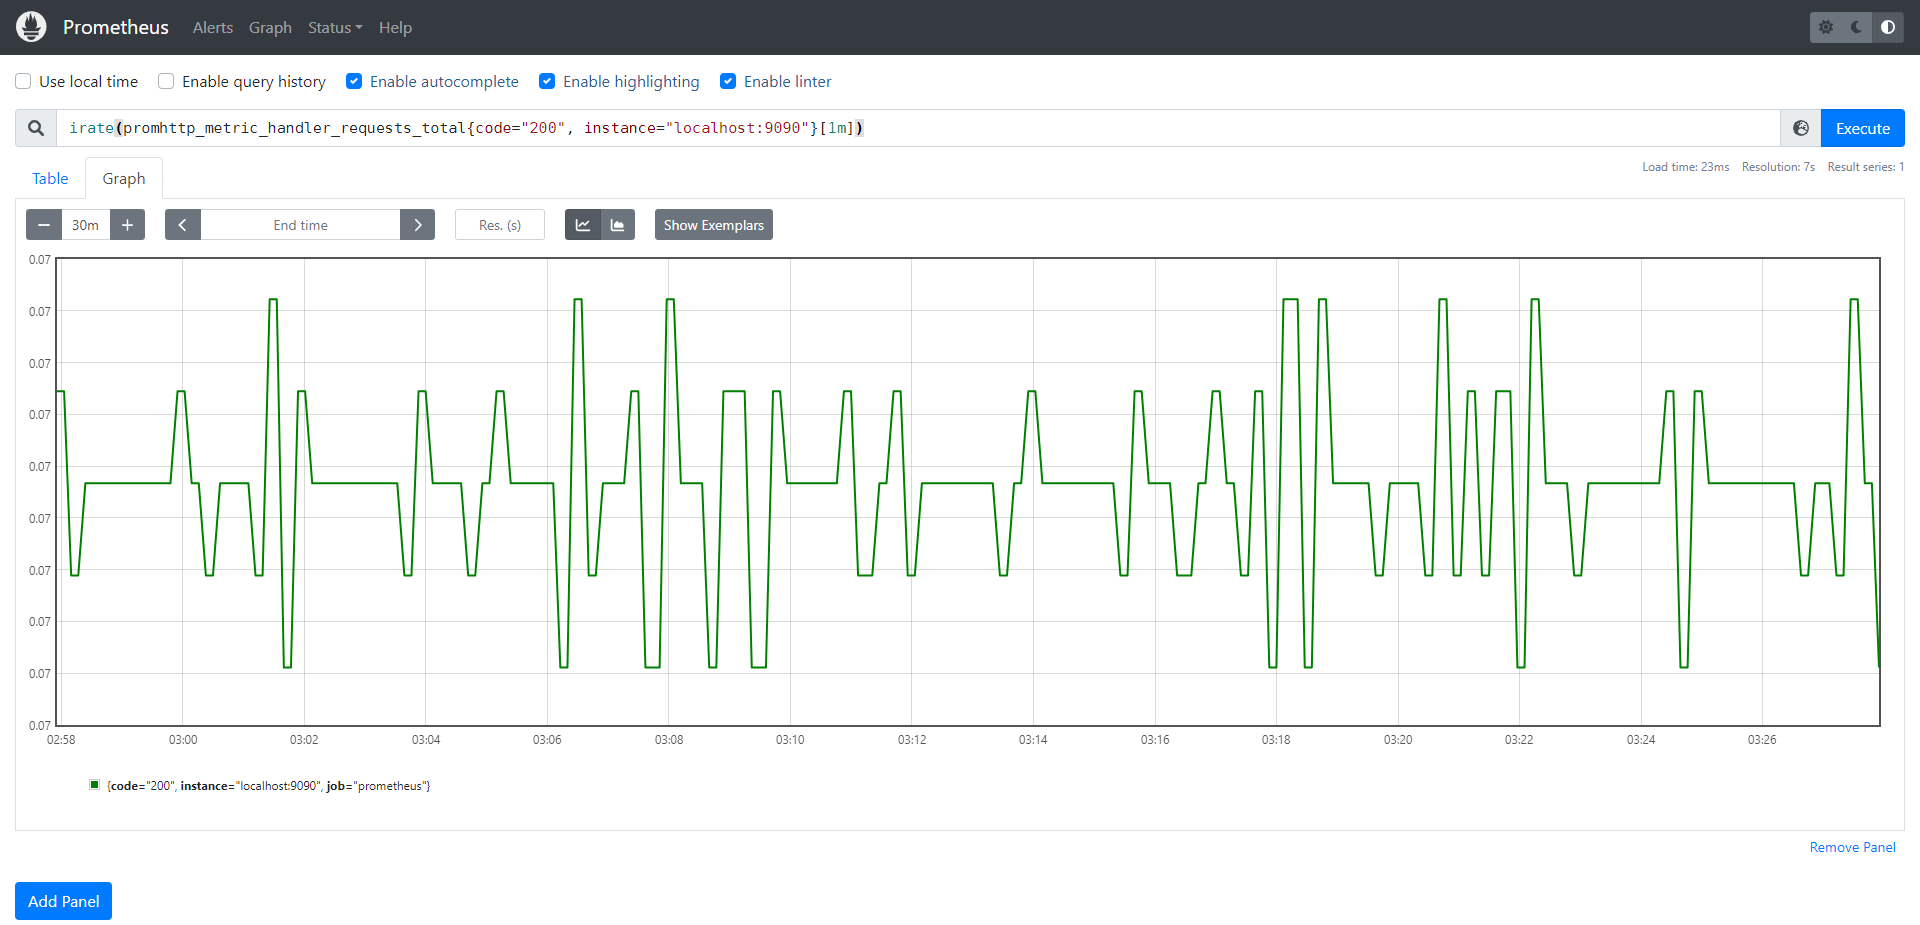
使用Prometheus Graph绘制一段时间内每个采样点的变化率。下图中指定查询了30m内,每个采样点的变化率,相当于将30m内的每个采样点都丢给rate(promhttp_metric_handler_requests_total{code="200", instance="localhost:9090"}[1m])表达式进行执行,将得到的一连串结果连线绘制图形。

其实也可以手动获取这一连串的结果,通过offset来指定获取之前时间的值,如下所示,取满30分钟或者说1800秒,如果说采样间隔是15s的话,那么30m内最多可以计算出120个瞬时向量,将这120个瞬时向量连起来,就得到Prometheus Graph展示的图形了。当然了,实际Prometheus并不会这样做,而是通过其他更加高效的方法来得到Prometheus Graph展示的图形。
1
2
3
4
5
|
rate(promhttp_metric_handler_requests_total{code="200", instance="localhost:9090"}[1m] offset)
rate(promhttp_metric_handler_requests_total{code="200", instance="localhost:9090"}[1m] offset 15s)
rate(promhttp_metric_handler_requests_total{code="200", instance="localhost:9090"}[1m] offset 30s)
...
rate(promhttp_metric_handler_requests_total{code="200", instance="localhost:9090"}[1m] offset 1800s)
|

rate()计算的结果是与区间选择高度相关的,如果选择的时间区间太短,小于采样间隔,那么区间内将没有两个采样点用于计算,则无法的到计算结果。通常来说区间的选择为采样间隔的四倍。比如采样间隔15s,则时间区间选择为1m。
irate()
irate()与rate()不同点在于它选取的是时间区间内最后两个点。因为是相邻的两个点,所以irate()更加灵敏,能更好的反应两个点之间的瞬时变化,也就是说irate()得到的图像更加尖锐。注意一下,时间区间与函数没啥关系。时间区间就像一个窗口,框选了一个范围,得到一系列的瞬时向量,而选择哪些向量来使用,是各个函数的事情。

increase()
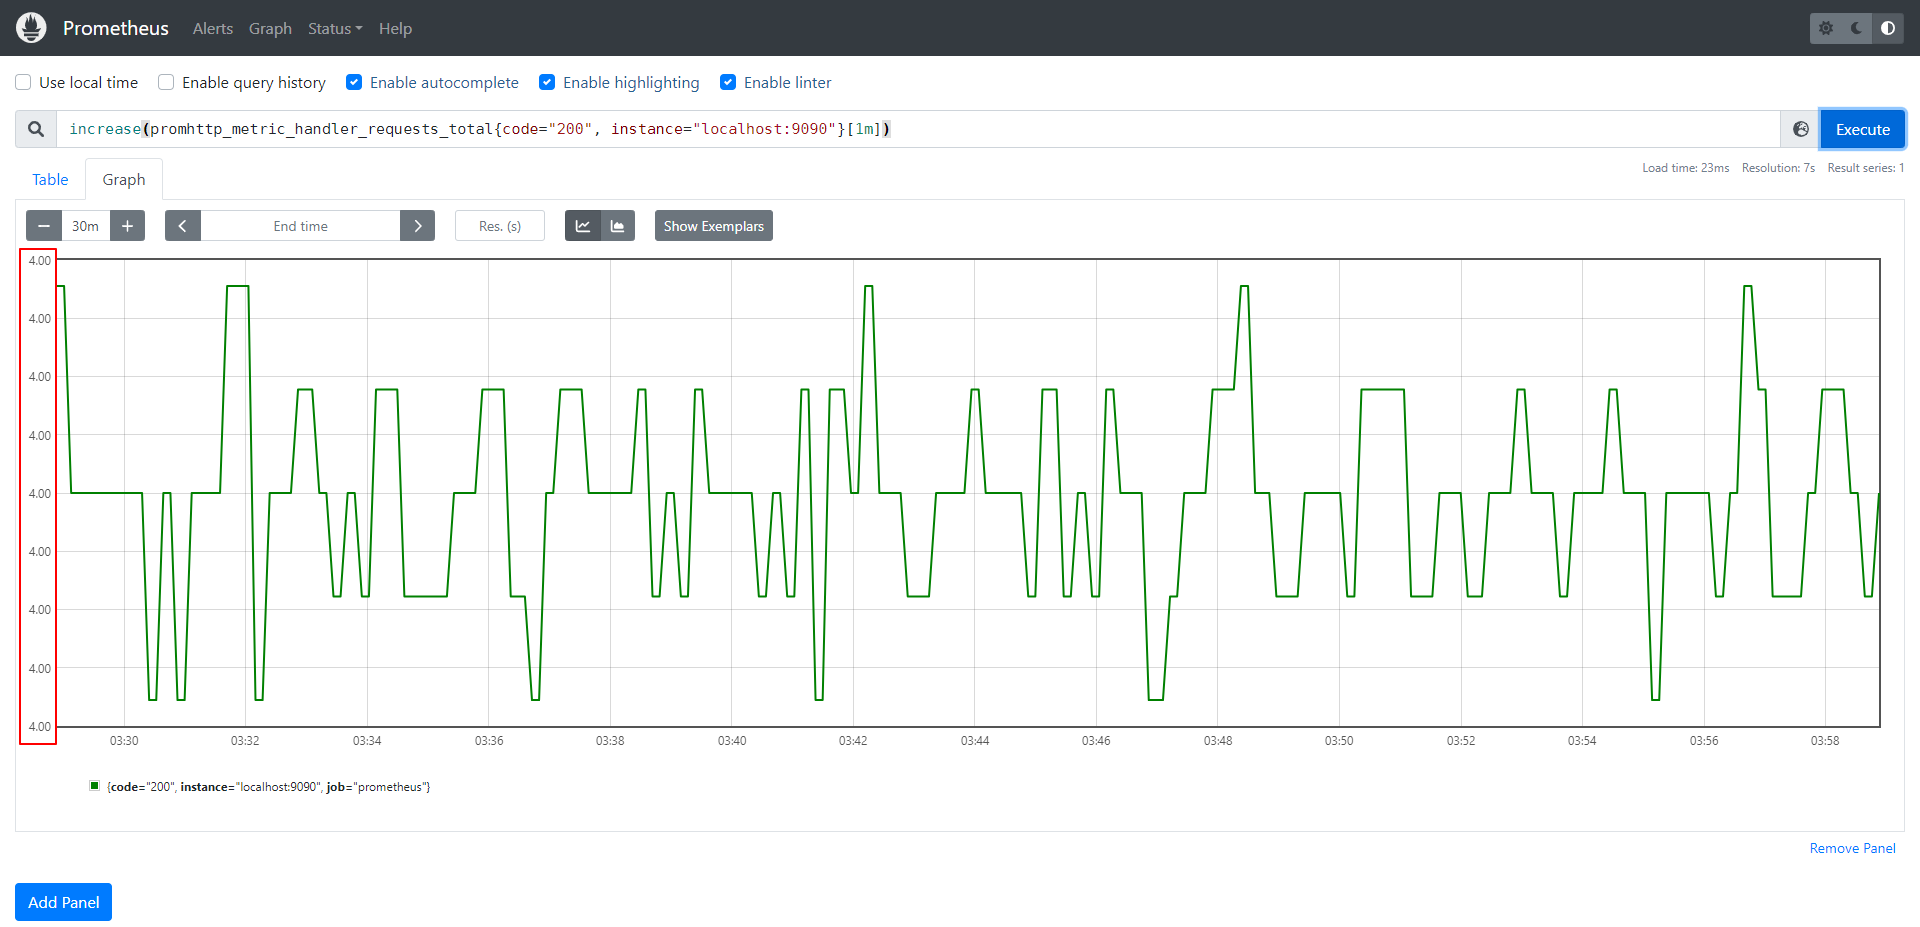
increase()使用方法和呈现图像都与rate()相似,区别在于Y轴数据是数值而非百分比。

delta()
rate()会假定传入的指标类型都是Counter类型的。如果一个函数假定传入的指标是Counter类型的,但是数据并不是单调递增,出现了数据值减小的情况,那么这类函数会认为是抓取指标的进程出问题(比如宕机导致该Counter值被重置了),而进行自动调整。比如时间序列的值为[5,10,4,6],则将其视为[5,10,14,16]。这就导致对于Gauge这种数据可能会增加或减少的指标而言,rate()是无法正确处理的。
也就是说,其实各个函数需要指定正确的数据类型的指标,才能正确工作。
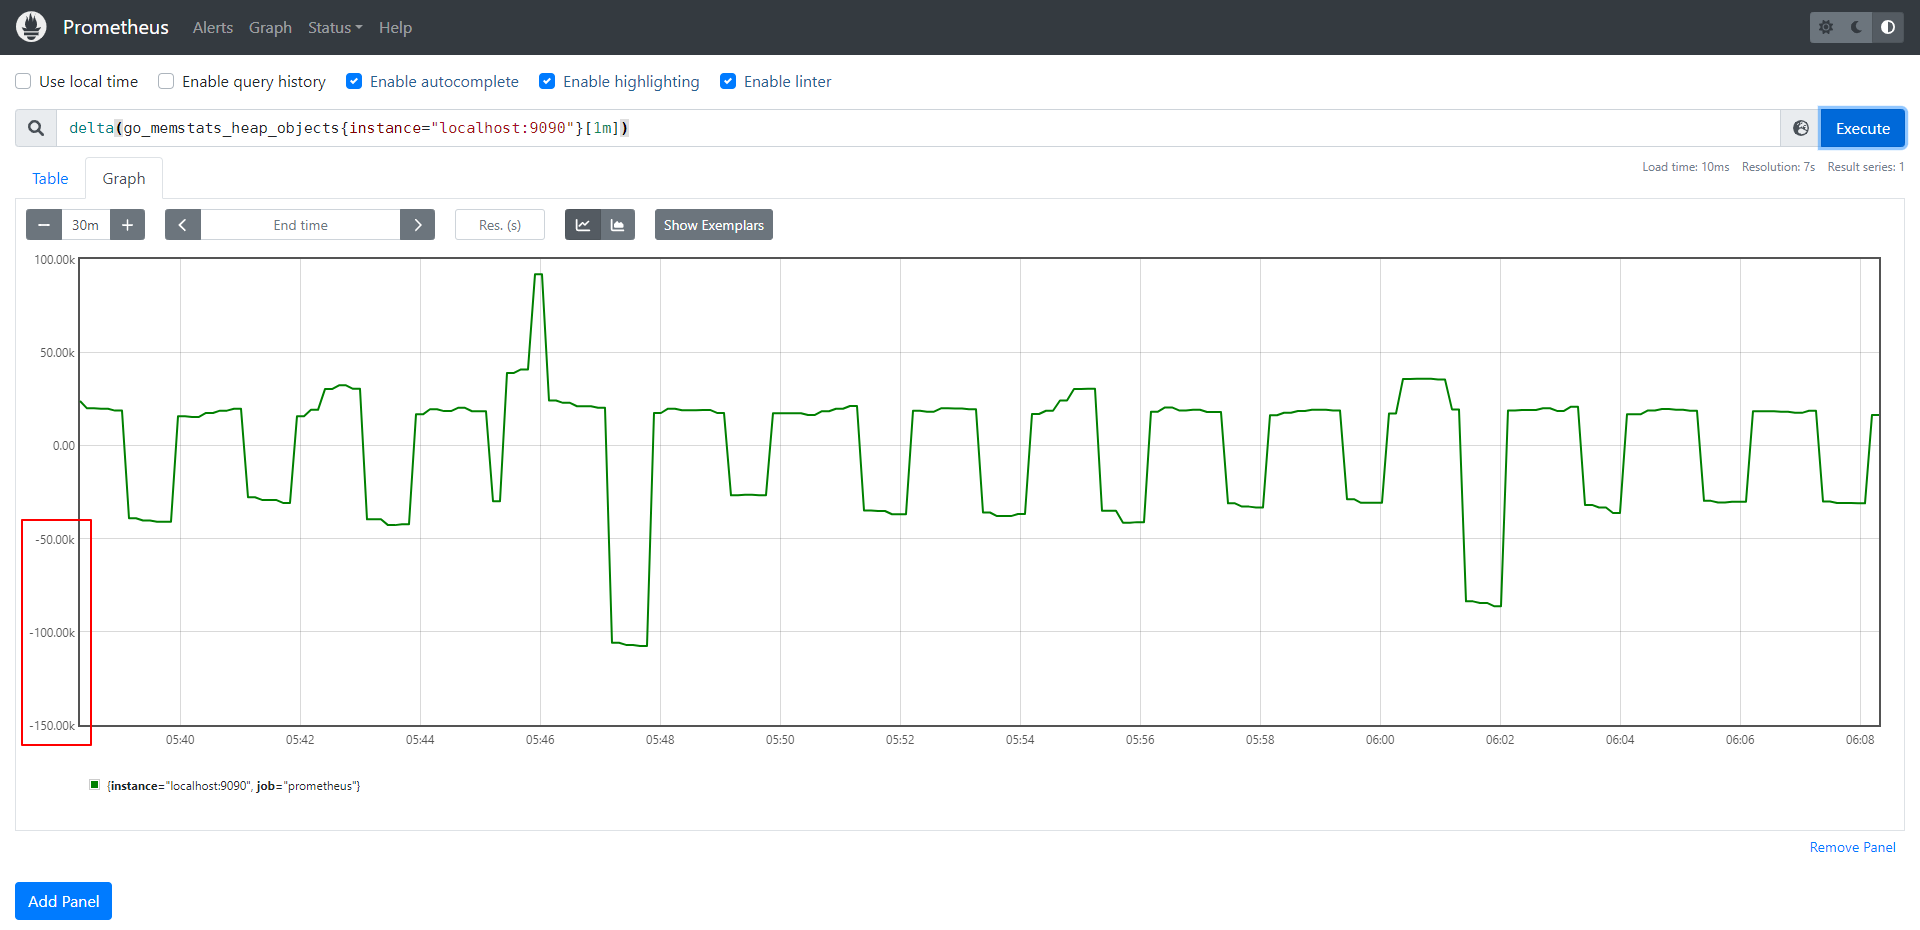
delta()函数可以正确的处理Gauge类型的指标。delta()计算时间区间内最后一个采样点和第一个采样点的差值,这个差值是可以为负数的。
下图查询go语言堆上对象的数量。

predict_linear()
predict_linear()根据一个区间向量来预测未来该值的变化情况,这种预测是线性的,如果数据是非线性的,那么预测的值可能毫无意义。
线性数据的典型例子是硬盘空间的使用情况,因为硬盘使用空间大多数情况下都是线性上升的,那么就可以通过一元线性回归方程来预测合适达到阈值,从而提前告警。
线性预测一般来说是通过历史数据的分布情况,通过梯度下降算法来拟合出一条直线,该直线可对应一个方程,将未来的时间戳输入该方程,即可得到预测的使用空间。
常用语句
字符串正则匹配:=~
目标端发现
Exporter
Exporter是应用与Prometheus之间的"适配器"。有了Exporter应用就无需在业务代码中实现指标采集的逻辑,而是由Exporter来采集并将其修改为Metric的格式上传给Prometheus。
Exporter是一个开放的标准接口,任何应用的指标都可以通过适配一个Exporter来接入Prometheus。
一些常见的Exporter:
- node_exporter:实现Linux主机的指标采集
- mysqld_exporter:实现MySQL的指标采集,支持Linux和Windows
- blackbox_exporte`:支持TCP/UDP/HTTP等网络探针的方式来探测网站,收集各个指标,如访问时间等
- windows_exporter:实现Windows主机的指标采集
自定义Exporter
Prometheus采集和存储的指标,都是Metrics类型的,因此应用想要接入Prometheus有两种方法,一种是云原生,也就是在应用设计实现之处就考虑使用k8s及其相关生态的能力,比如拆分成微服务,使用k8s的水平扩展弹性扩缩容能力,而监控方面使用k8s生态的Prometheus,采集应用本身的指标为Metrics类型并暴露接口给Promethues采集。第二种方法是将自定义指标转换成Metrics类型的指标,适合应用实现时未考虑使用现在希望使用Prometheus的应用,这种方法可以不入侵业务代码,通过增加一层数据转换层的方式实现指标采集。
下面以阿里云的账单数据为例,写一个Exporter通过阿里云API获取账单信息,再转换成Metrics类型的指标,暴露接口给Prometheus采集,最后通过Grafana进行展示。
最后期望实现如下效果:
Exporter采集阿里云账单数据Exporter将账单数据区分出各个产品使用金额,各个产品购买数量,各个项目使用的产品金额,每个月使用总金额的变化,暴露指标,方便后续聚合和计算- 定制
Grafana模板,对数据进行聚合和计算,比如费用变化的折线图,各个产品线使用金额的饼图等等
- 每个月或每个季度将各个产品线使用的金额通过邮件或钉钉或微信等方式,发送给具体的业务负责人
- 结合
Altermanager对即将超出预算的产品线发出告警
Grafana介绍
Alertmanager
Altermanager是一个独立的组件,负责接收来自Prometheus的告警信息,然后对这些告警信息进行统一管理。Altermanager支持多种功能,核心功能如下:
- 告警路由
- 告警静默
- 告警抑制
- 邮件通知
- 告警分组
- Webhook
- 高可用
分组(Grouping)
根据标签名来分组,多个相同的告警只会触发一次通知。比如一个集群的多个副本,因为数据库宕机了同时报数据库连接错误的告警,那么只需要知道一次即可。
抑制(Inhibition)
匹配到某个critical的标签时,抑制其他标签的告警。常用于关键节点宕机,而引发的告警风暴,只需要处理critical标签的告警即可,其他都是因为这个告警而引发的。
静默(Silences)
直接给某些标签配置一个静默时间,在静默时间内不会收到这些标签的告警信息。静默是在web页面上配置的,属于实时调整告警的一种手段。比如某些已知问题正在修复的,可以手动静默这些告警。
告警触发流程
Prometheus根据配置文件的evaluation_interval计算间隔对rule文件中的告警规则进行计算- 如果
expr规则表达式条件满足会发送status=pending的告警信息,表示告警静默中。如果条件满足且持续了for设置的时长,会发送status=firing的告警信息,表示告警触发。如果条件满足,但未持续for设置的时长,发送status=inactive的告警信息,表示告警已恢复。
- 所有类型的告警都会推送至
Prometheus配置文件中配置一个或多个的alertmanagers
Altermanager收到告警根据告警信息状态、抑制器和静默配置选择发送、抑制或静默- 需要发送告警信息的将会根据
group_by分组,根据route进行标签匹配,将告警路由到指定receiver
receiver根据配置决定发送至邮件还是webhook- 最后再根据
send_resolved配置决定告警恢复后是否发送恢复信息
配置文件
文档地址:https://prometheus.io/docs/alerting/latest/configuration/
  1
  2
  3
  4
  5
  6
  7
  8
  9
 10
 11
 12
 13
 14
 15
 16
 17
 18
 19
 20
 21
 22
 23
 24
 25
 26
 27
 28
 29
 30
 31
 32
 33
 34
 35
 36
 37
 38
 39
 40
 41
 42
 43
 44
 45
 46
 47
 48
 49
 50
 51
 52
 53
 54
 55
 56
 57
 58
 59
 60
 61
 62
 63
 64
 65
 66
 67
 68
 69
 70
 71
 72
 73
 74
 75
 76
 77
 78
 79
 80
 81
 82
 83
 84
 85
 86
 87
 88
 89
 90
 91
 92
 93
 94
 95
 96
 97
 98
 99
100
101
102
103
104
105
106
107
108
109
110
111
112
113
114
115
116
117
118
119
120
121
122
123
124
125
126
127
128
129
130
131
132
133
134
135
136
137
138
139
140
141
|
global:
  smtp_smarthost: 'smtp.sina.com:25'
  smtp_from: 'hts_0000@sina.com'
  smtp_auth_username: 'hts_0000@sina.com'
  smtp_auth_password: 'c0106ffddcafca6e'  # 使用网易邮箱的授权码
  smtp_hello: 'sina.com'
  smtp_require_tls: false

  wechat_api_url: "https://qyapi.weixin.qq.com/cgi-bin/"
  wechat_api_secret: <secret>
  wechat_api_corp_id: <string>

# Files from which custom notification template definitions are read.
# The last component may use a wildcard matcher, e.g. 'templates/*.tmpl'.
templates:
# The root node of the routing tree.
route:
  # 这里的标签列表是接收到报警信息后的重新分组标签,例如,接收到的报警信息里面有许多具有 cluster=A 和 alertname=LatncyHigh 这样的标签的报警信息将会批量被聚合到一个分组里面
  group_by: ['alertname', 'cluster']
  # 当一个新的报警分组被创建后,需要等待至少 group_wait 时间来初始化通知,这种方式可以确保您能有足够的时间为同一分组来获取多个警报,然后一起触发这个报警信息。
  group_wait: 30s
  # 相同的group之间发送告警通知的时间间隔
  group_interval: 5m
  # 如果一个报警信息已经发送成功了,等待 repeat_interval 时间来重新发送他们,不同类型告警发送频率需要具体配置
  repeat_interval: 1h
  # 默认的receiver:如果一个报警没有被一个route匹配,则发送给默认的接收器
  receiver: 'sina.email'
  # 上面所有的属性都由所有子路由继承,并且可以在每个子路由上进行覆盖。
  routes:
    - receiver: 'frontend-pager'
      matchers:
      - severity="critical"
    - receiver: sina.email
      group_wait: 10s
      match:
        team: node
    # All alerts with the team=frontend label match this sub-route.
    # They are grouped by product and environment rather than cluster
    # and alertname.
    - receiver: 'frontend-pager'
      group_by: [product, environment]
      matchers:
      - team="frontend"

    # All alerts with the service=inhouse-service label match this sub-route.
    # the route will be muted during offhours and holidays time intervals.
    # even if it matches, it will continue to the next sub-route
    - receiver: 'dev-pager'
      matchers:
        - service="inhouse-service"
      mute_time_intervals:    # 指定时间期间不接受告警信息
        - offhours
        - holidays
      continue: true

    # All alerts with the service=inhouse-service label match this sub-route
    # the route will be active only during offhours and holidays time intervals.
    - receiver: 'on-call-pager'
      matchers:
        - service="inhouse-service"
        - foo=~"foo"
      active_time_intervals:  # oncall 放假也得上班!
        - offhours
        - holidays
# A list of notification receivers.
receivers:
  - name: 'web.hook'
    webhook_configs:
      - url: 'http://127.0.0.1:5001/'
  - name: 'sina.email'
    email_configs:
      - to: 'hts_0000@sina.com'
        send_resolved: true  # 接受告警恢复的通知
  - name: 'frontend-pager'
    email_configs:
      - to: 'hts_0000@sina.com'
        send_resolved: true  # 接受告警恢复的通知
  - name: 'on-call-pager'
    email_configs:
      - to: 'hts_0000@sina.com'
        send_resolved: true  # 接受告警恢复的通知
  - name: 'dev-pager'
    email_configs:
      - to: 'hts_0000@sina.com'
        send_resolved: true  # 接受告警恢复的通知
  # - name: 'wechat'
  #   wechat_configs:
  #     - send_resolved: false  # Whether to notify about resolved alerts.
  #       api_secret: global.wechat_api_secret  # The API key to use when talking to the WeChat API.
  #       api_url: global.wechat_api_url  # The WeChat API URL.
  #       corp_id: global.wechat_api_corp_id  # The corp id for authentication.
  #       message: '{{ template "wechat.default.message" . }}'  # API request data as defined by the WeChat API.
  #       message_type: 'text'  # Type of the message type, supported values are `text` and `markdown`.
  #       agent_id: '{{ template "wechat.default.agent_id" . }}'
  #       to_user: '{{ template "wechat.default.to_user" . }}'
  #       to_party: '{{ template "wechat.default.to_party" . }}'
  #       to_tag: '{{ template "wechat.default.to_tag" . }}'
# A list of inhibition rules.
inhibit_rules:
  - source_match:
      severity: 'critical'
    target_match:
      severity: 'warning'
    equal: ['alertname', 'dev', 'instance']
# A list of time intervals for muting/activating routes.
time_intervals:
  - name: 'offhours' # 停机时间
    time_intervals:
      - times:
          - start_time: '02:00'
            end_time: '05:00'
        weekdays:
          - 'monday:friday' # 工作日
          - 'sunday'        # 周日
        days_of_month:
          - '5'             # 每个月5号
          - '-5:-1'         # 每个月最后5天
        months:
          - '1:12'          # 1~12月
        years:
          - '2023:3202'     # 2023~3202年
        # location: 'Asia/Shanghai' # 指定时区
  - name: 'holidays' # 假期时间
    time_intervals:
      - months:
          - '1:2' # 春节
        # 其他的不指定则匹配所有,也就是这个时间为每年1到2月的每天每时每刻
        # times:
        #   - start_time: 02:00
        #     end_time: 05:00
        # weekdays:
        #   - 'monday:friday' # 工作日
        #   - 'sunday'        # 周日
        # days_of_month:
        #   - '5'             # 每个月5号
        #   - '-1:-5'         # 每个月最后5天
        # months:
        #   - '1:12'          # 1~12月
        # years:
        #   - '2023:3202'     # 2023~3202年
        # location: 'Asia/Shanghai' # 指定时区
|
实操
下载Prometheus
下载地址:https://prometheus.io/download/
配置Prometheus
prometheus配置文件为:prometheus.yml。初始的配置文件如下所示。
 1
 2
 3
 4
 5
 6
 7
 8
 9
10
11
12
13
14
15
16
17
18
19
20
21
22
23
24
25
26
27
28
29
|
# my global config
global:
  scrape_interval: 15s # Set the scrape interval to every 15 seconds. Default is every 1 minute.
  evaluation_interval: 15s # Evaluate rules every 15 seconds. The default is every 1 minute.
  scrape_timeout: 15s # scrape_timeout is set to the global default (10s).

# Alertmanager configuration
alerting:
  alertmanagers:
    - static_configs:
        - targets:
          # - alertmanager:9093

# Load rules once and periodically evaluate them according to the global 'evaluation_interval'.
rule_files:
  # - "first_rules.yml"
  # - "second_rules.yml"

# A scrape configuration containing exactly one endpoint to scrape:
# Here it's Prometheus itself.
scrape_configs:
  # The job name is added as a label `job=<job_name>` to any timeseries scraped from this config.
  - job_name: "prometheus"

    # metrics_path defaults to '/metrics'
    # scheme defaults to 'http'.

    static_configs:
      - targets: ["localhost:9090"]
|
重点关注配置文件中global和scrape_configs这两个block。
global block中配置含义如下:
- scrape_interval:抓取数据间隔
- evaluation_interval:告警间隔
scrape_configs block中配置含义如下:
- job_name:目标端的自定义名称
- static_configs:指示连接目标端使用静态配置的方式,
Prometheus还支持目标发现
- targets:抓取
metric默认采用的是http pull的方式,需要指定ip和端口,默认将从/metrics路由拉取metric格式的数据
启动Prometheus
启动命令:prometheus --config.file=prometheus.yml。
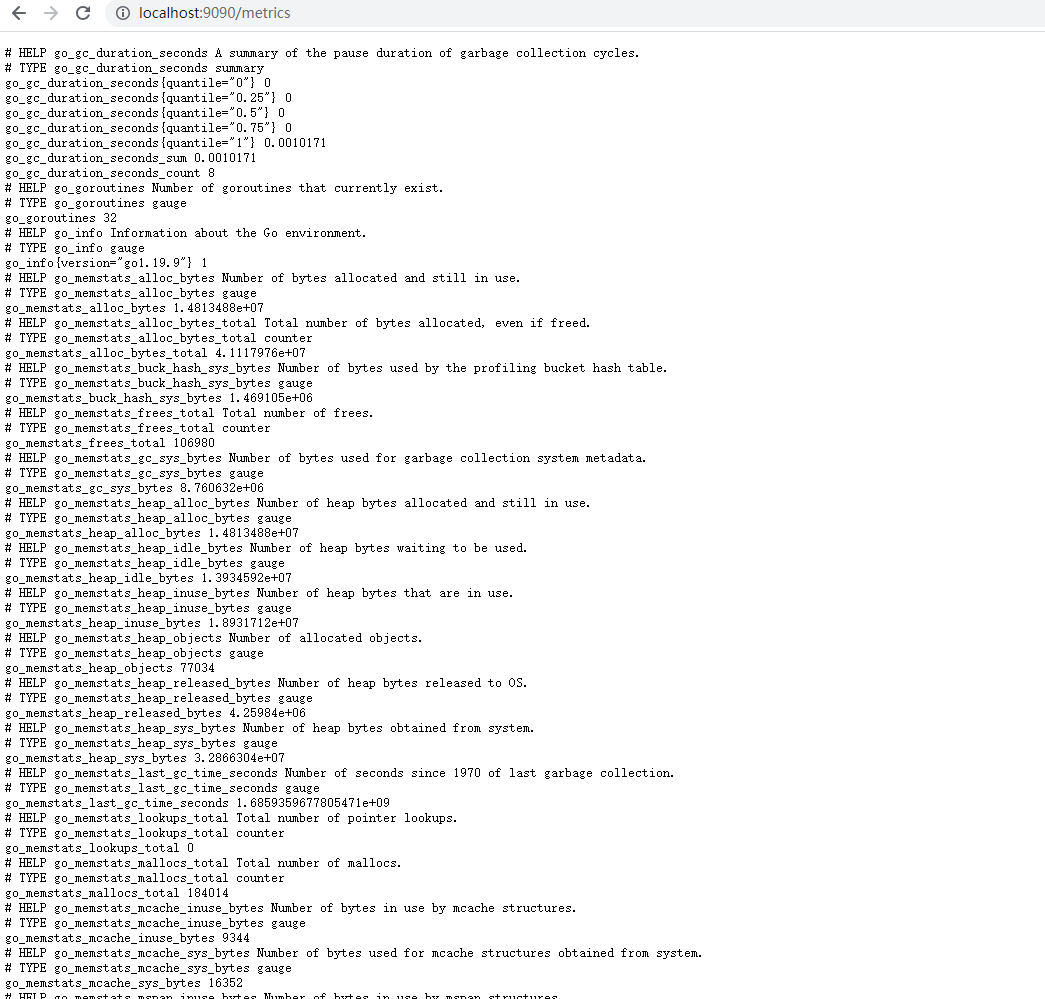
在prometheus.yml配置文件中,scrape_configs block默认配置了prometheus本身的监控。prometheus通过localhost:9090/metrics地址向外暴露自身的metric格式的指标数据,prometheus server则通过这个接口采集并存储相关数据。如果我们直接访问这个接口,将得到如图所示的metric数据。

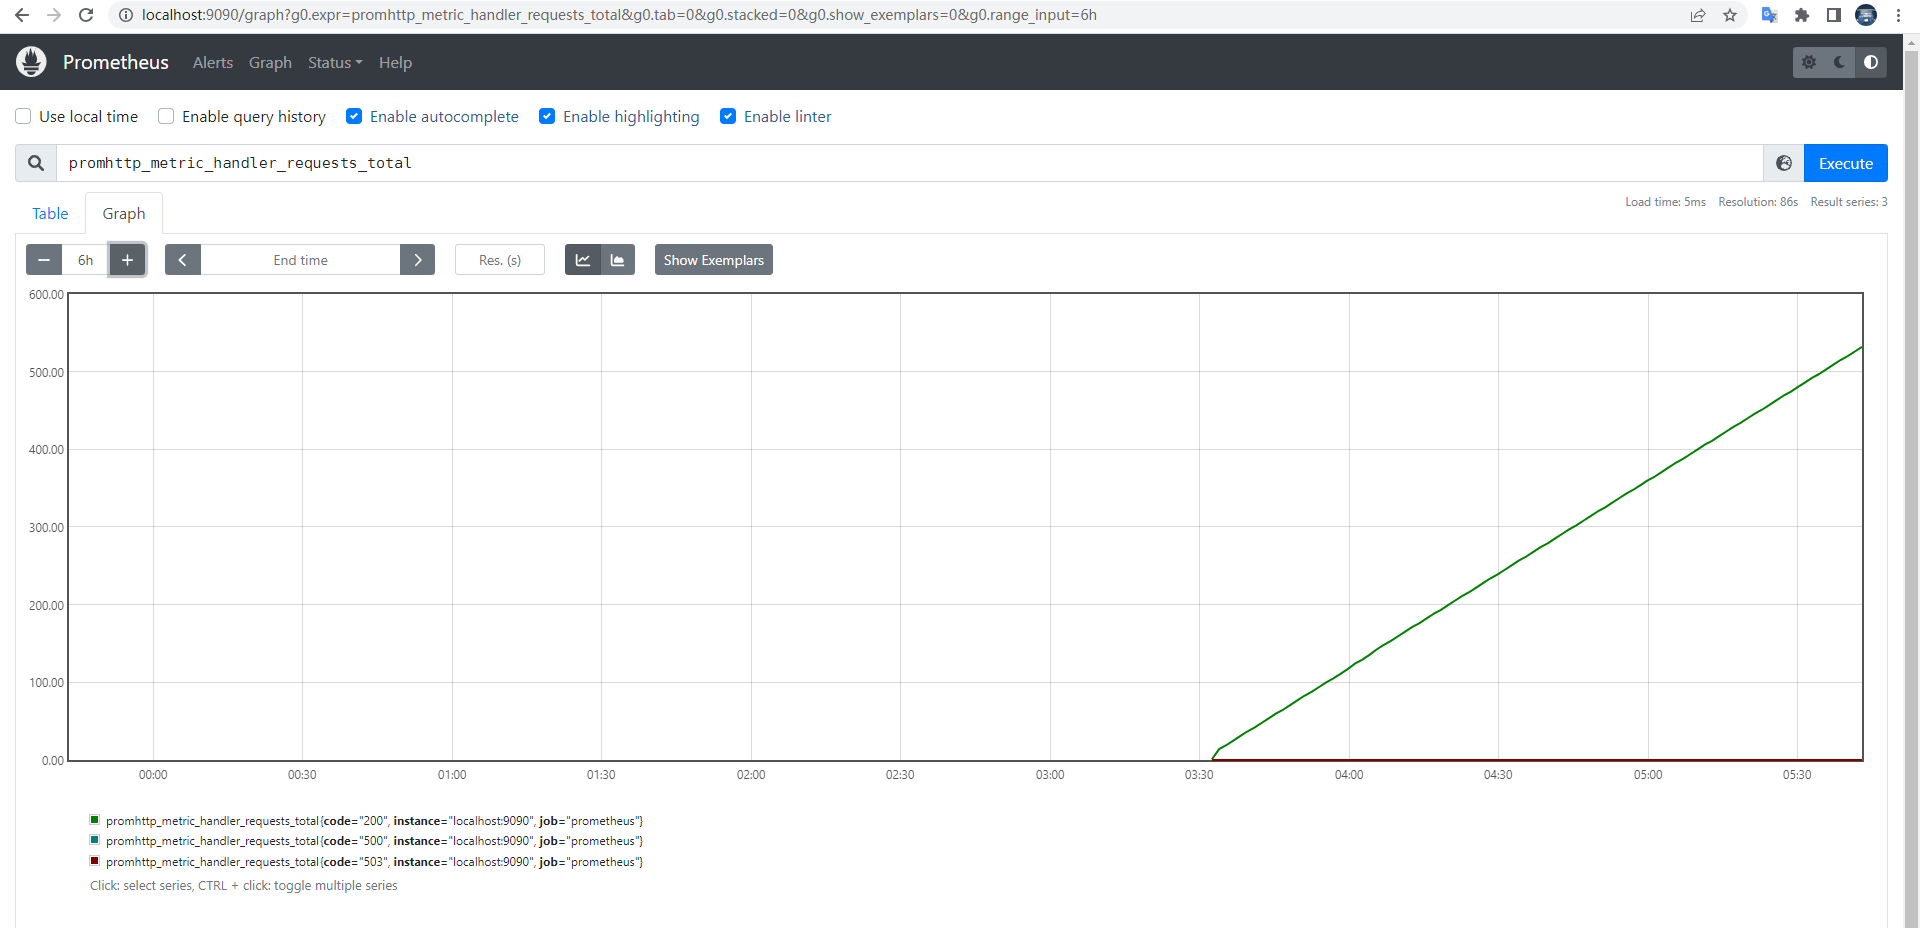
在众多metrics中有一个名为promhttp_metric_handler_requests_total的metric,记录了prometheus的/metrics接口各个状态的访问次数。

也可以访问http://localhost:9090/graph,通过可视化的方式展示这个时序数据。

promhttp_metric_handler_requests_total这个metric只有code一个维度,它包含了200/500/503这3个值,使用PromQL语言可以查询灵活的查询指定值。
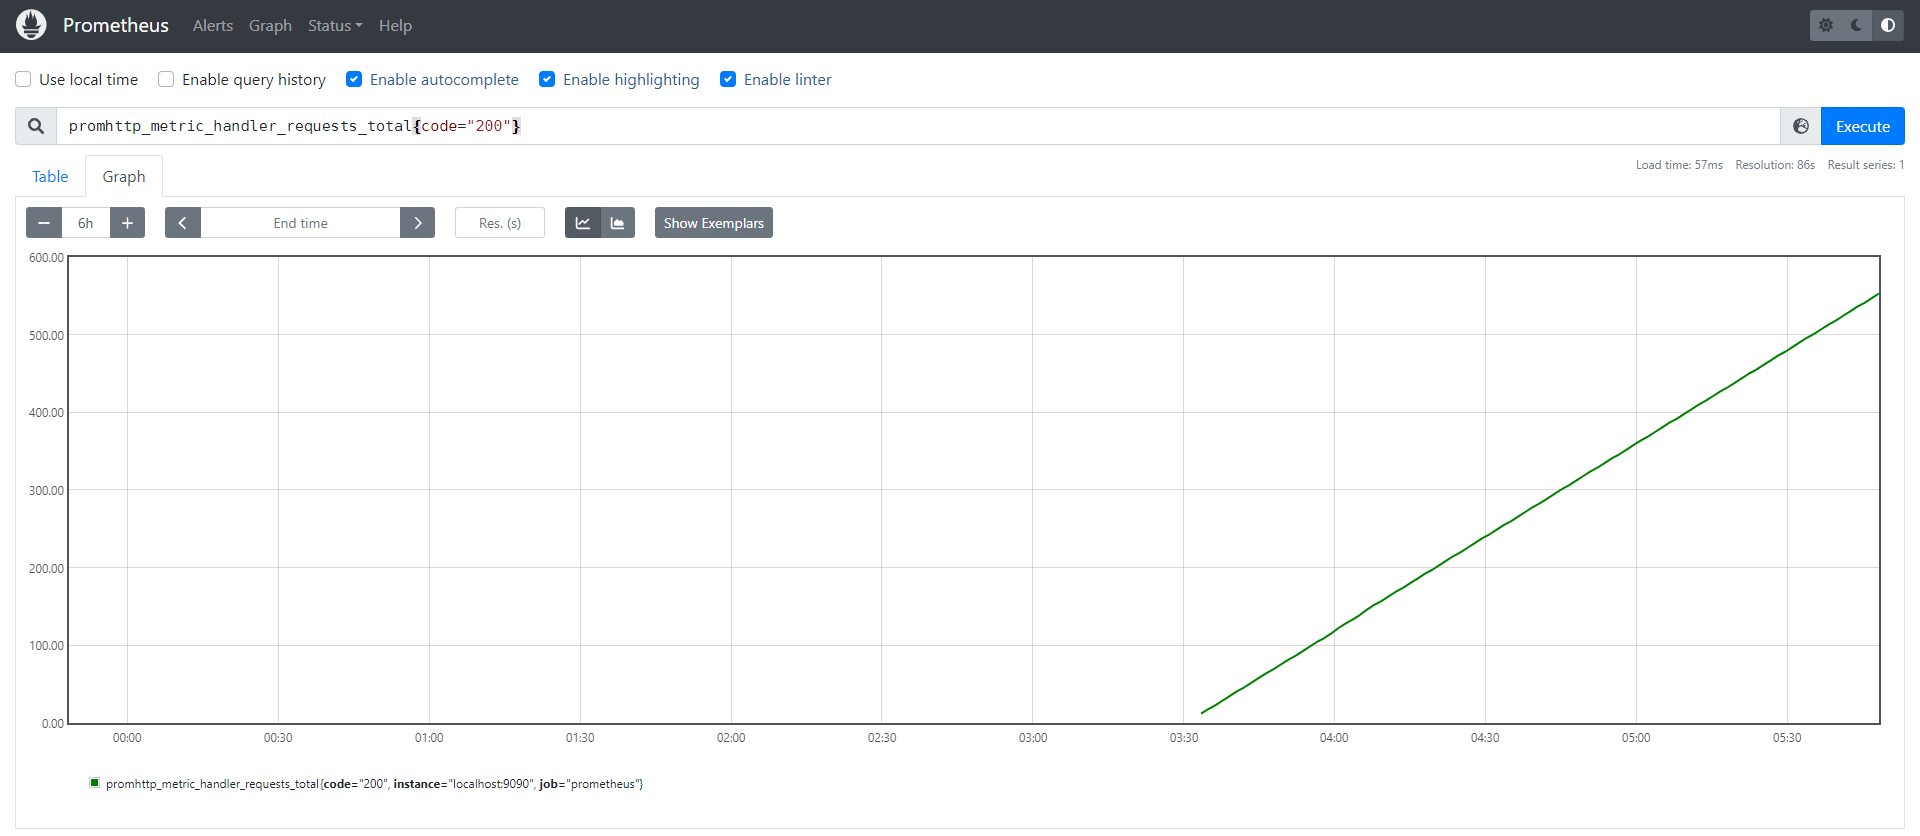
使用promhttp_metric_handler_requests_total{code="200"}来查询接口状态正常的时序数据。

安装MySQL Exporter
下载地址:https://prometheus.io/download/
启动MySQL Exporter前需要给Exporter配置一个只读账户。
1
2
|
CREATE USER 'exporter'@'localhost' IDENTIFIED BY 'XXXXXXXX' WITH MAX_USER_CONNECTIONS 3;
GRANT PROCESS, REPLICATION CLIENT, SELECT ON *.* TO 'exporter'@'localhost';
|
MySQL Exporter启动需要指定.cnf类型的配置文件读取用户名和密码,可以将配置写在MySQL的配置文件my.cnf中,也可以单独写一个文件。需要添加的配置如下。
1
2
3
|
[client]
user = exporter
password = XXXXXXXX
|
启动MySQL Exporter:mysqld_exporter --config.my-cnf="my.cnf" --web.listen-address=":9104"。
然后就可以通过访问http://localhost:9104/metrics来获取MySQL的metric了。
一些重要的metric:
- mysql_global_variables_max_connections:允许最大连接数
- mysql_global_status_threads_connected:当前连接数
配置Prometheus拉取MySQL Exporter的metric
在Prometheus配置文件prometheus.yml的scrape_configs中添加一个job:
 1
 2
 3
 4
 5
 6
 7
 8
 9
10
11
12
13
|
scrape_configs:
  # The job name is added as a label `job=<job_name>` to any timeseries scraped from this config.
  - job_name: "prometheus"

    # metrics_path defaults to '/metrics'
    # scheme defaults to 'http'.

    static_configs:
      - targets: ["localhost:9090"]

  - job_name: "mysql"
    static_configs:
      - targets: ["localhost:9104"]
|
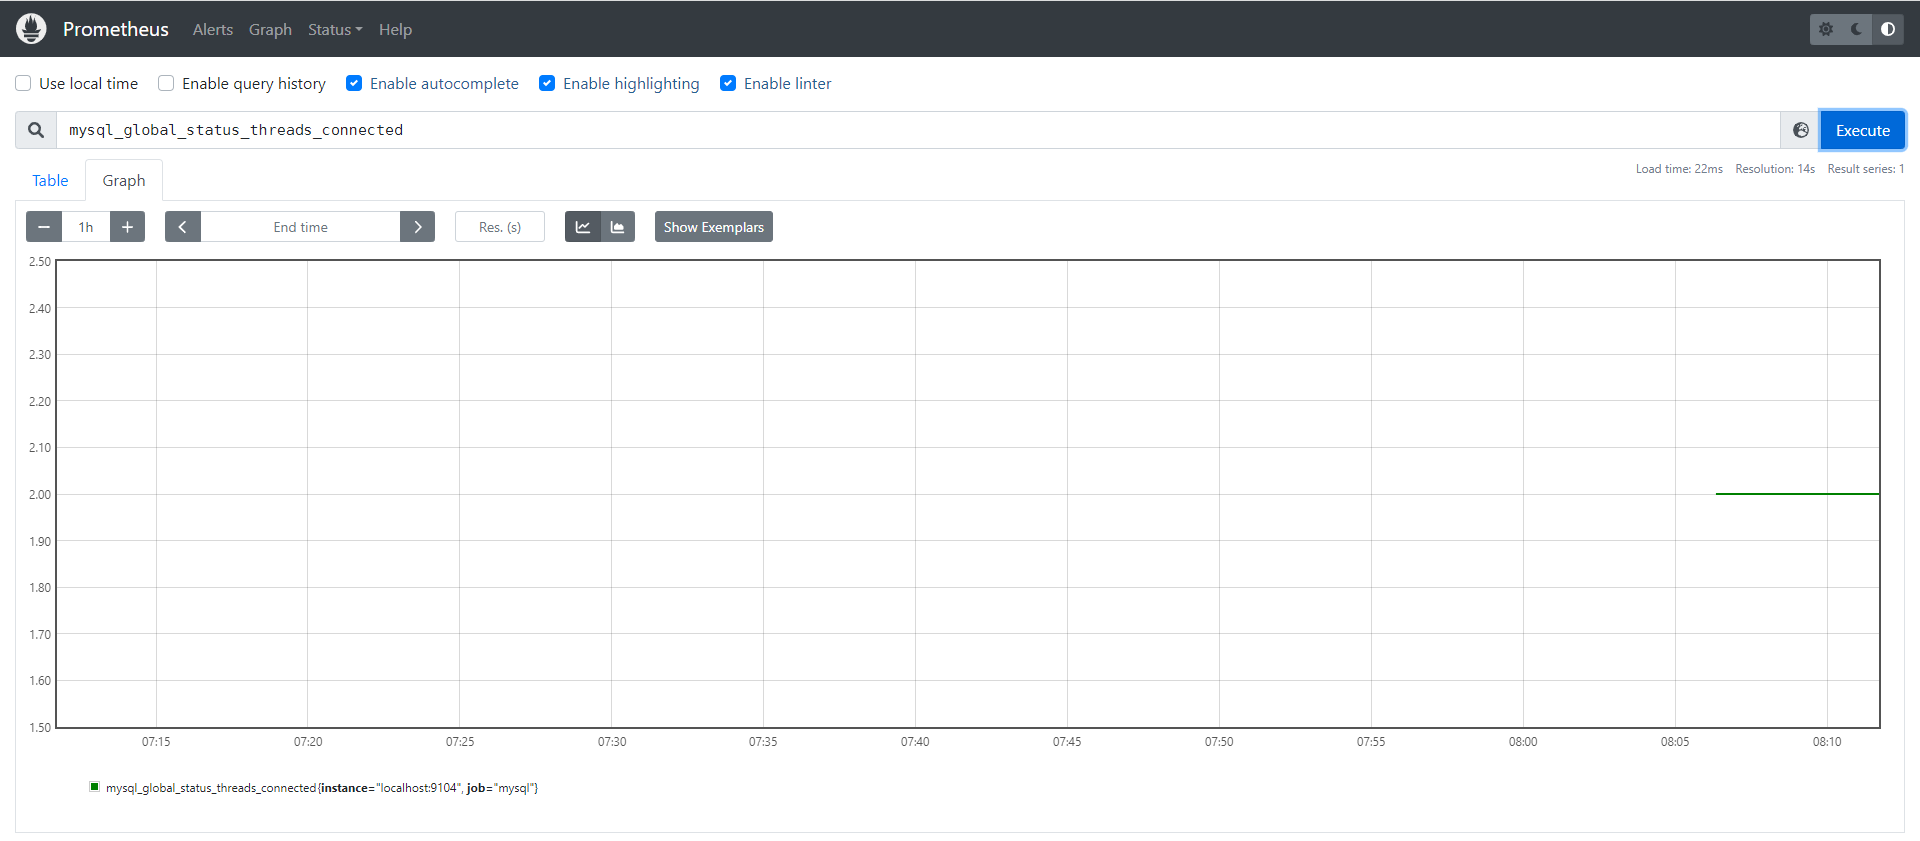
重启Prometheus,在Graph页面就可以查询到MySQL Exporter采集的metric了。

安装Grafana
下载地址:https://grafana.com/grafana/download
启动Grafana
Grafana启动后默认运行在:3000端口,默认登录用户名和密码为:admin/admin。
为Grafana添加Prometheus数据源
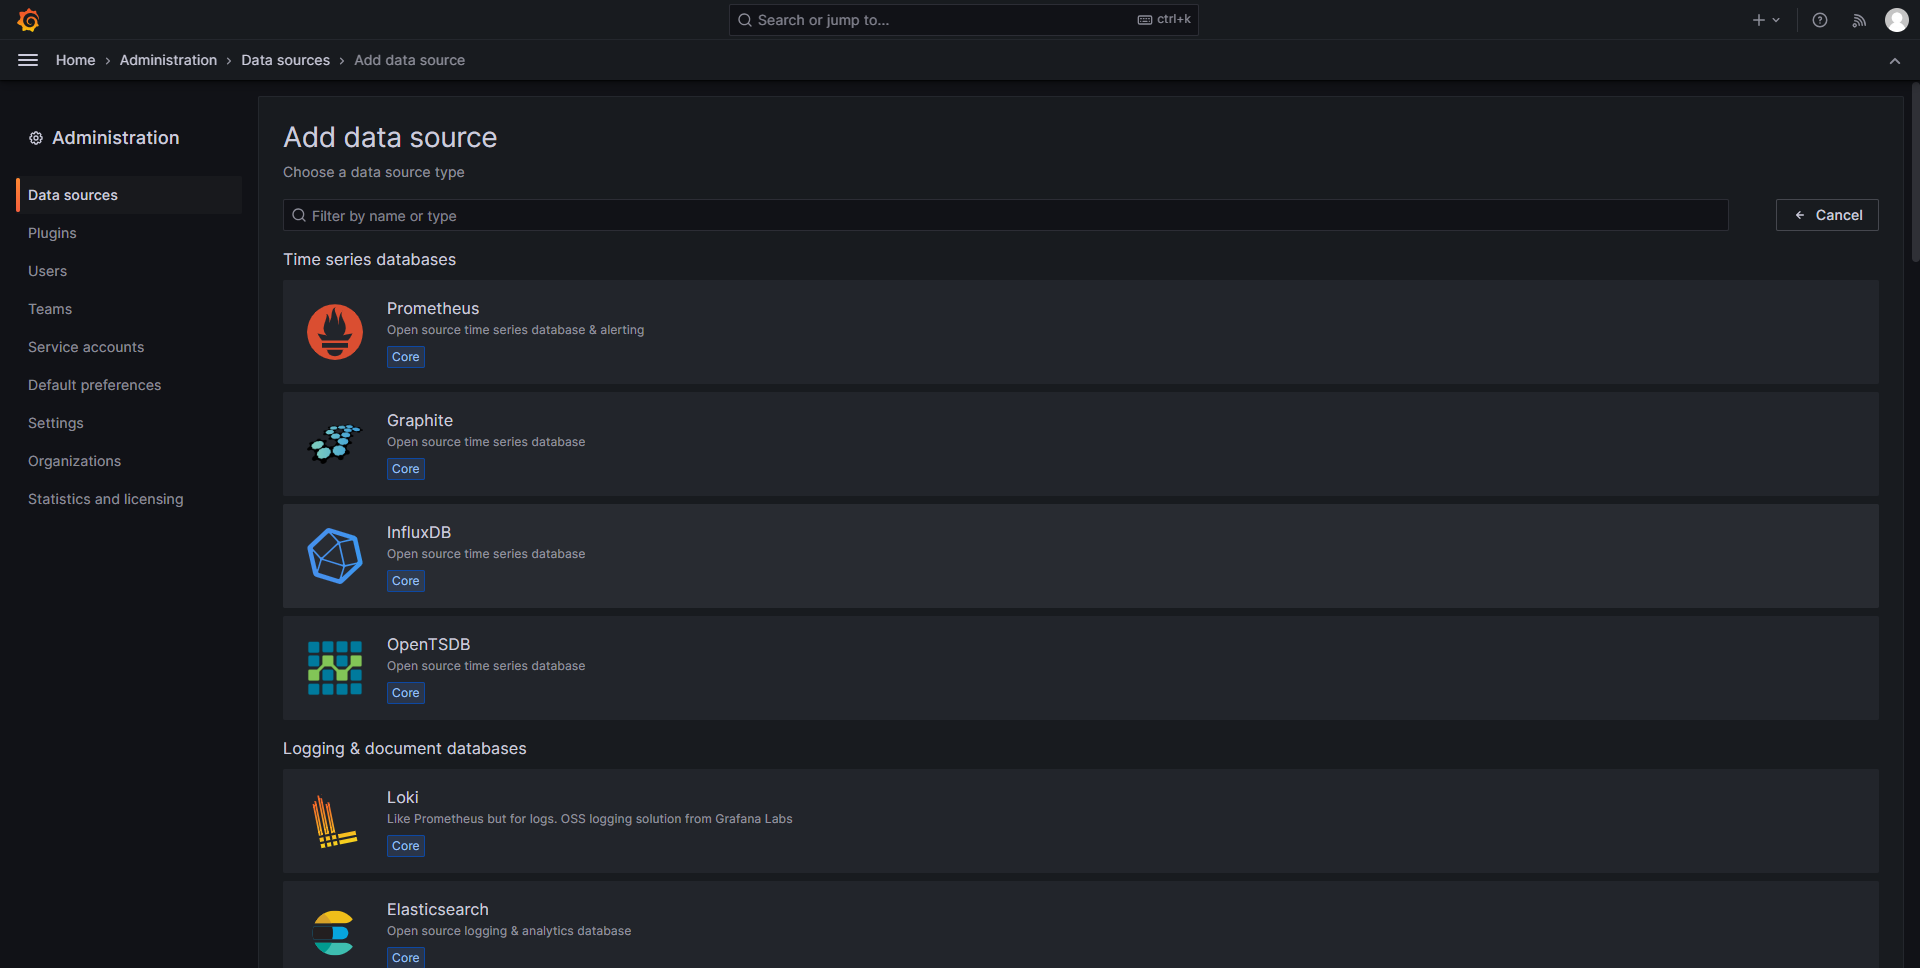
Grafana需要从数据源中读取并展示数据,Grafana支持多种数据源。

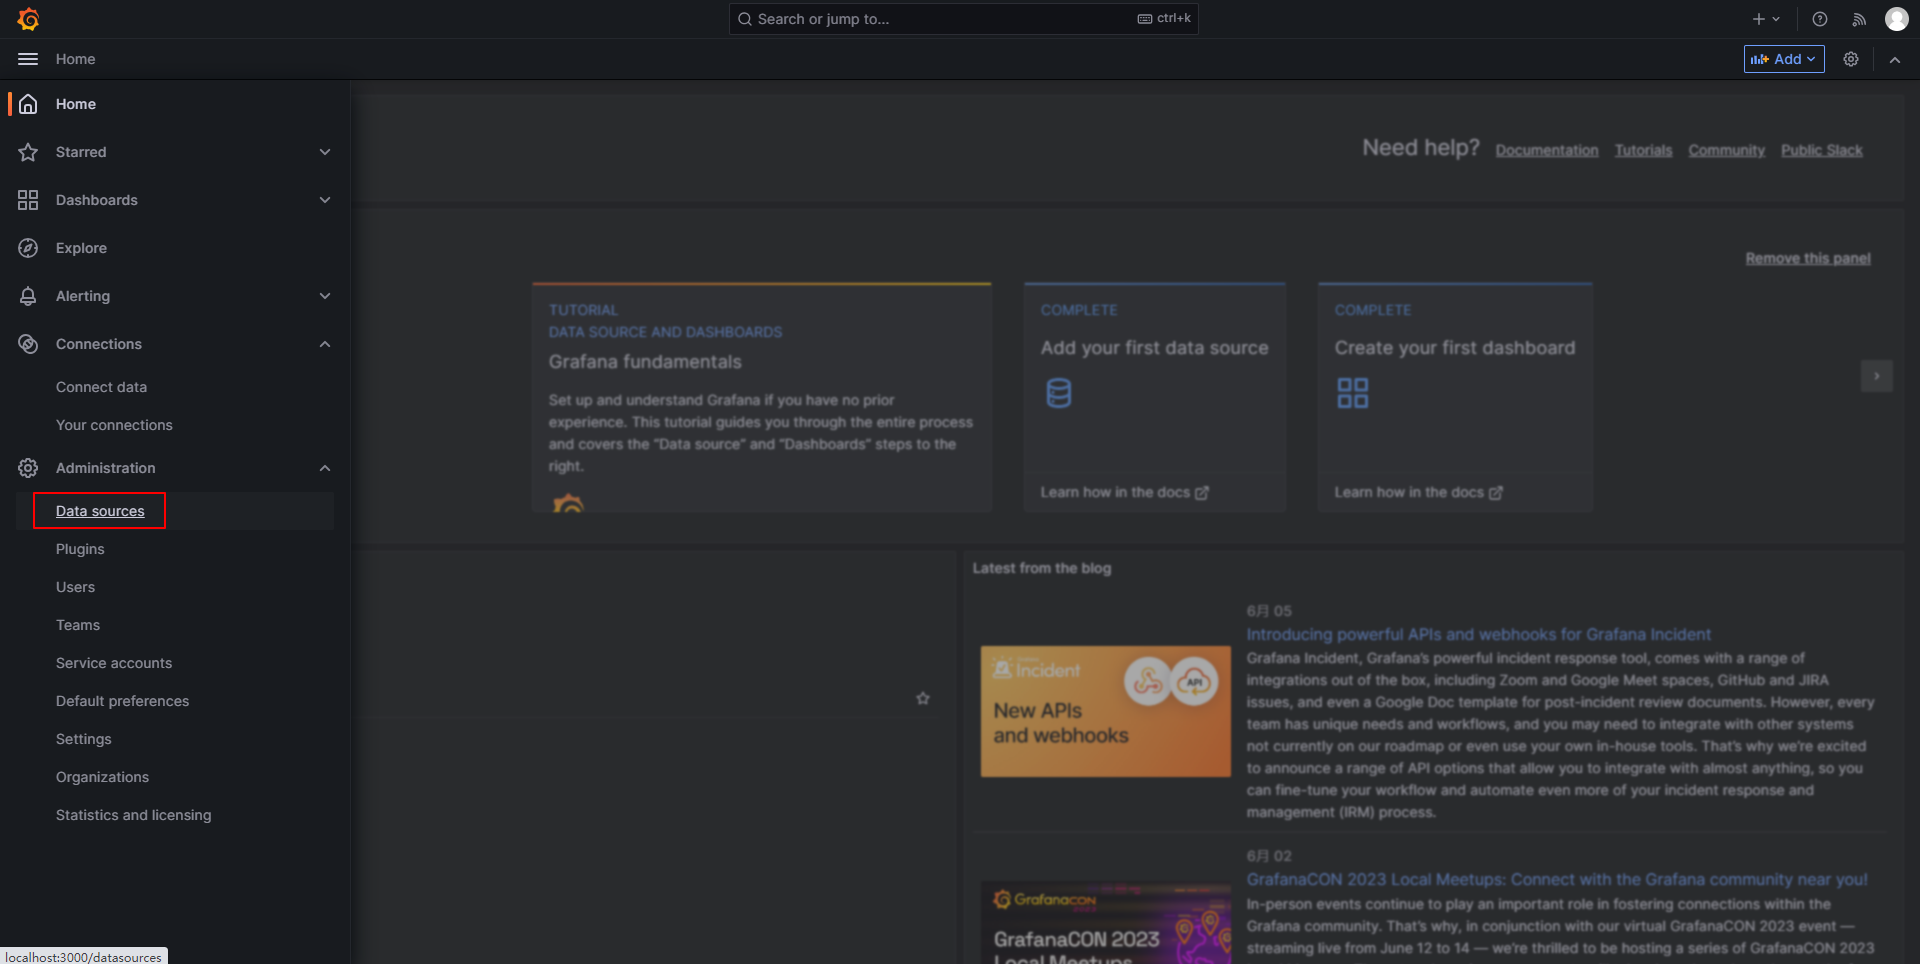
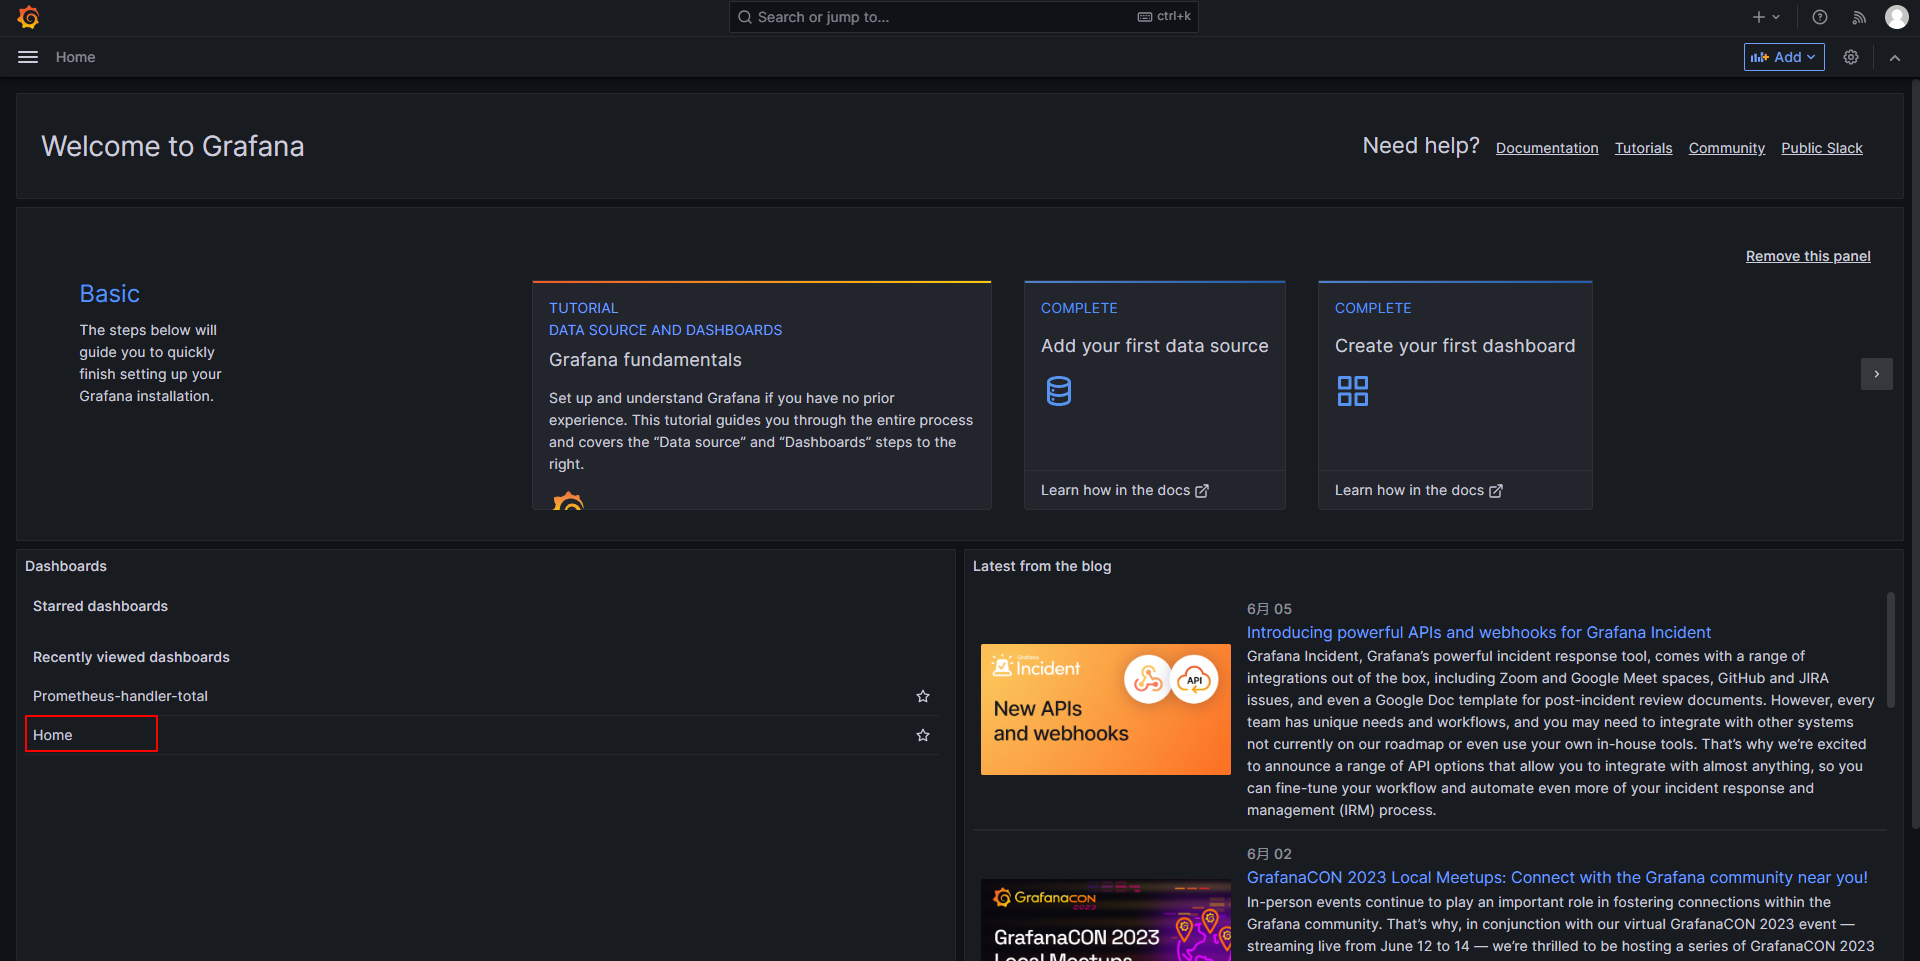
点击Data sources来进入添加数据源界面。

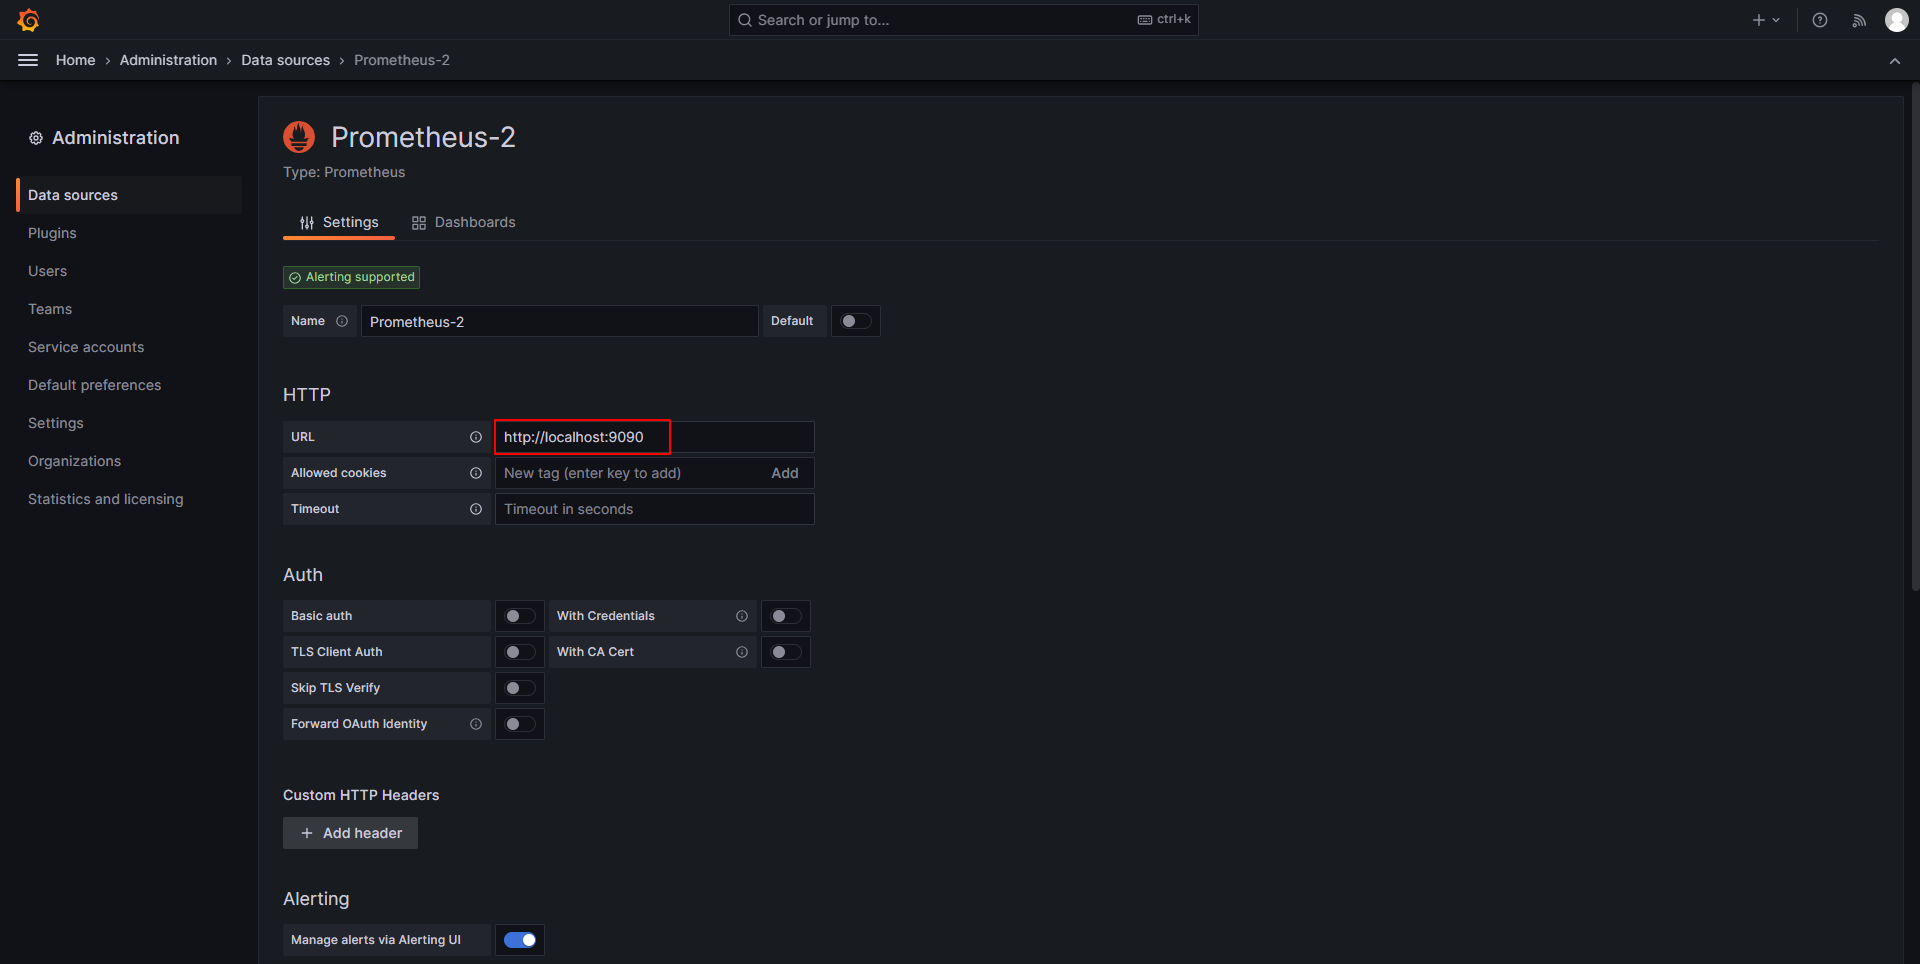
选择Prometheus添加数据源,配置其地址和端口,在底部选择Save & test保存。

配置DashBoard
DashBoard是一整个页面,里面可以有多个不同类型的Panel(看板)。Panel支持任意拖拽和改变大小,存在多个看板是非常方便修改界面。鼠标在看板顶部可以拖拽,在右下角可以伸缩大小。
下面来为DashBoard创建几个Panel。
时间序列看板
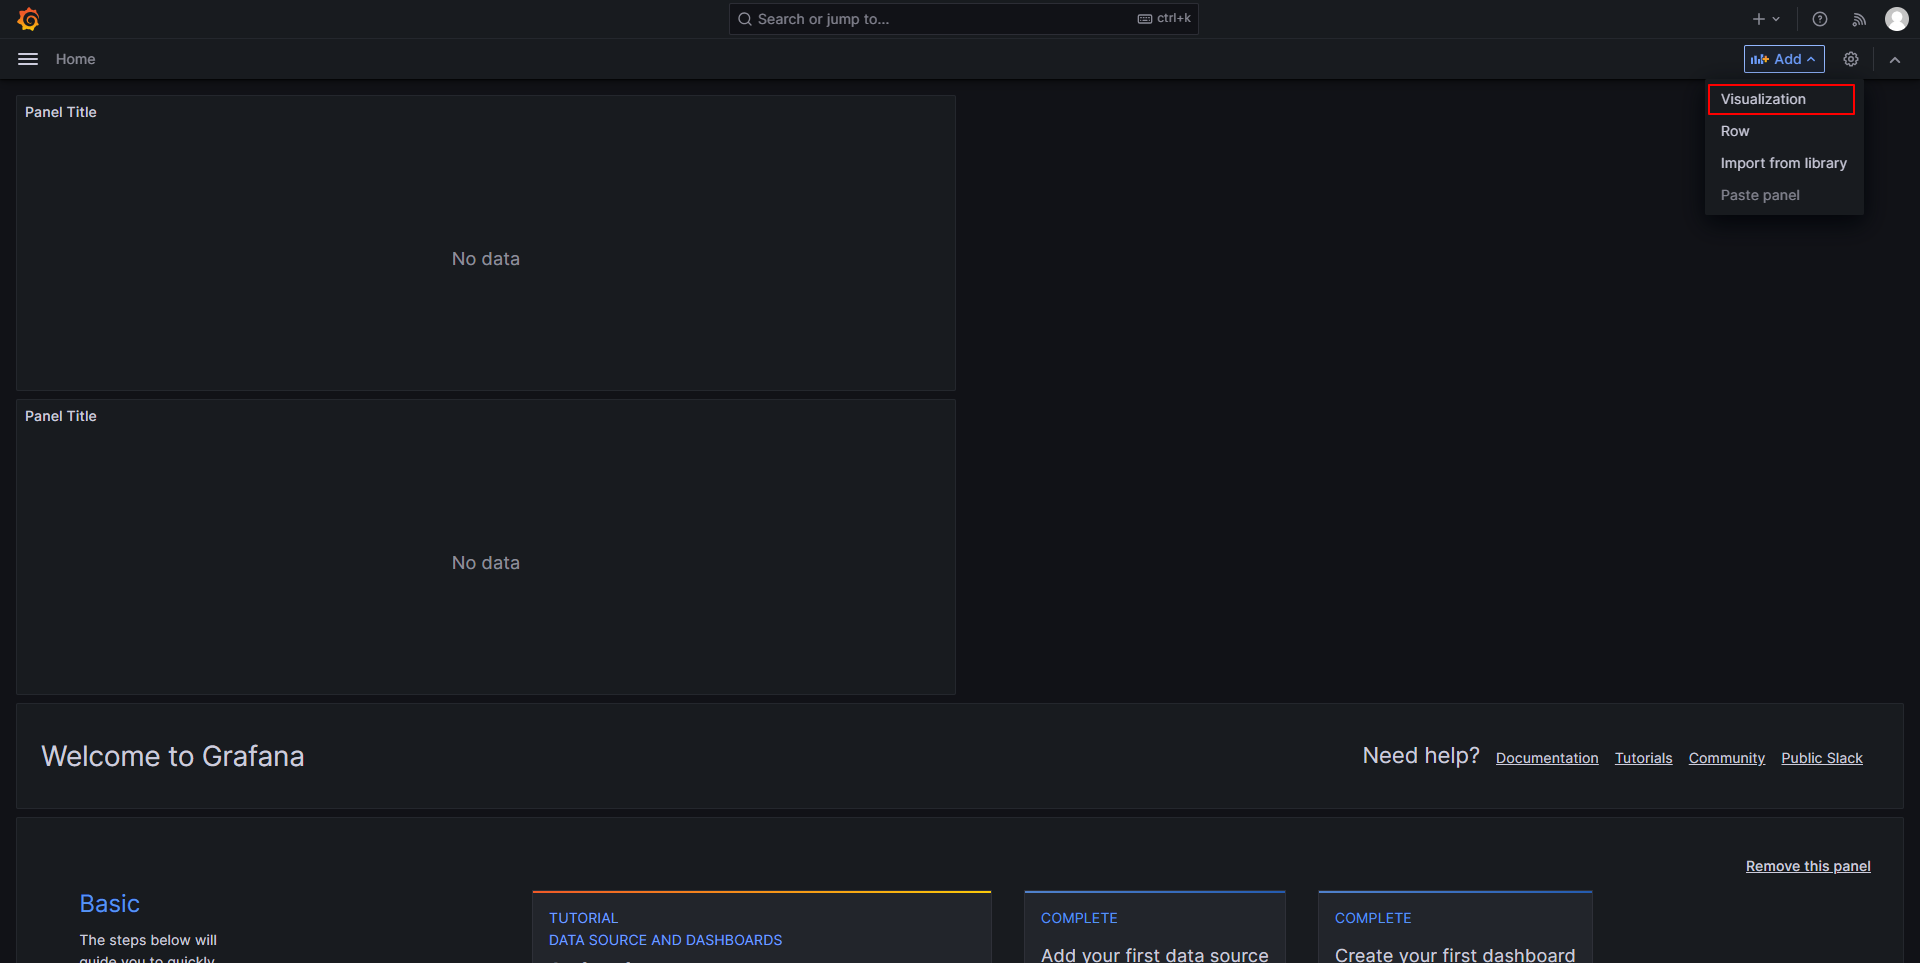
回到首页,点击右上角的Add按钮,为这个DashBoard配置监控看板。

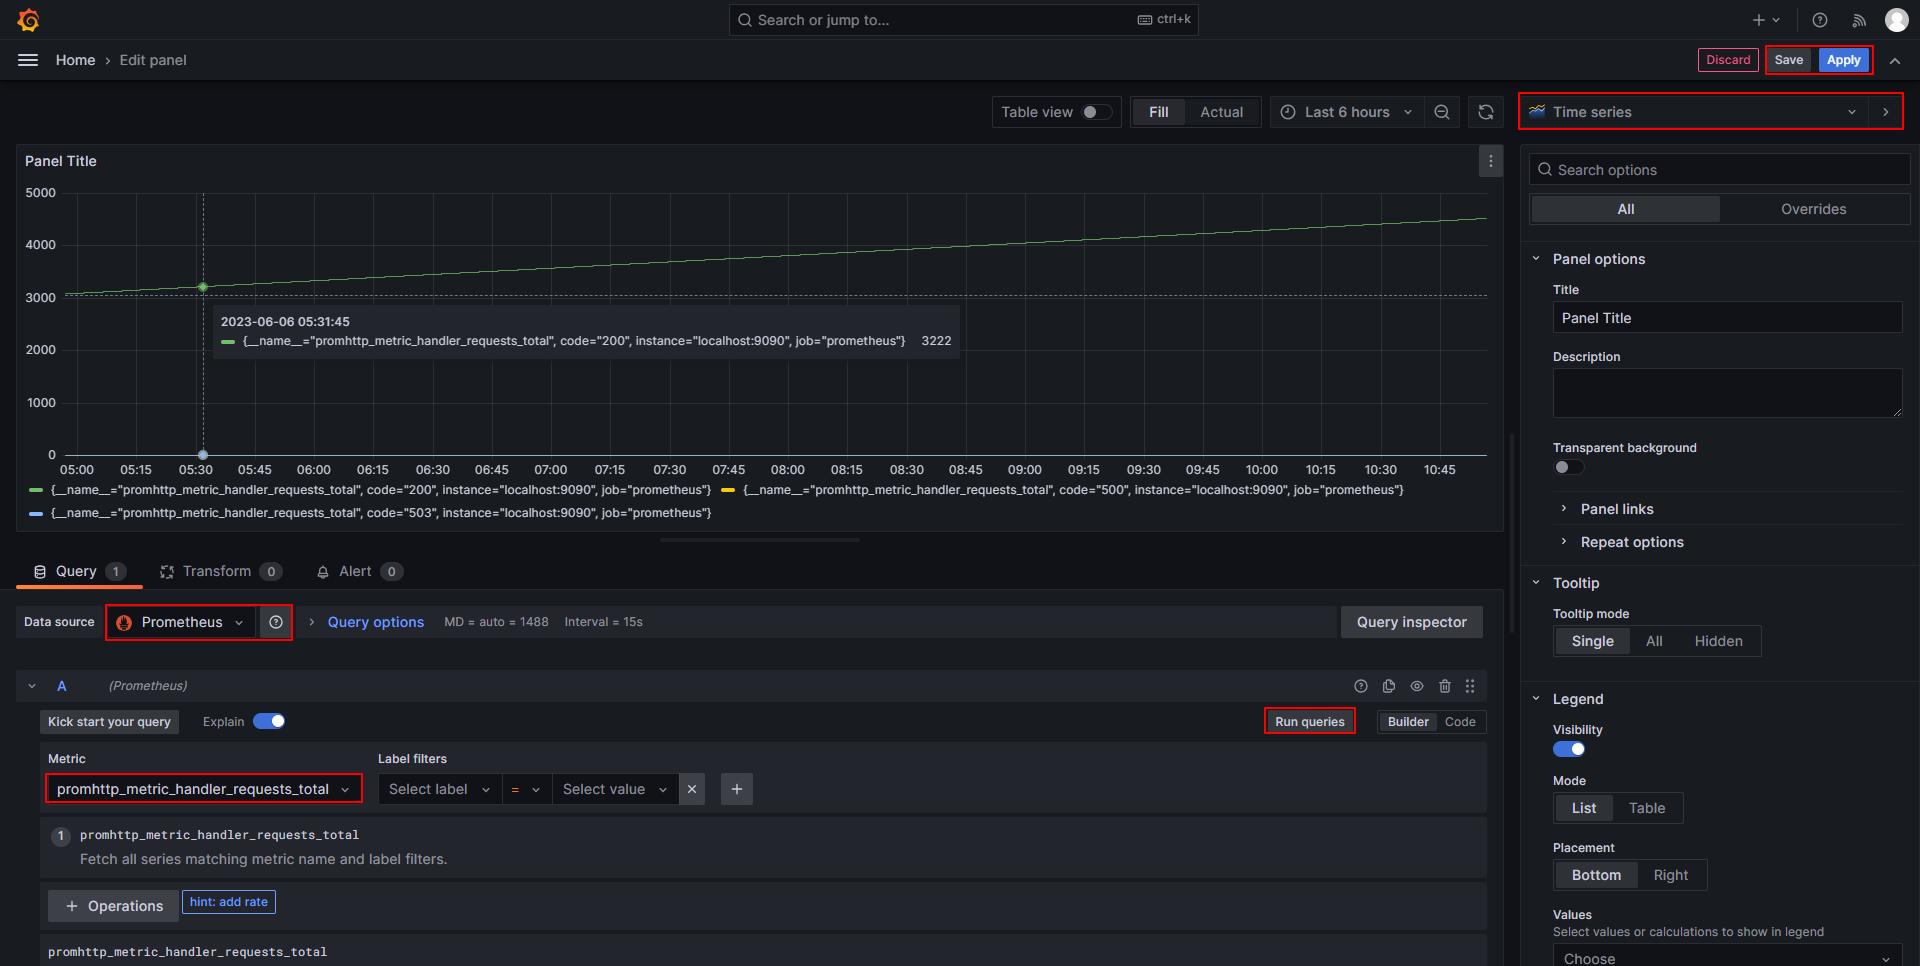
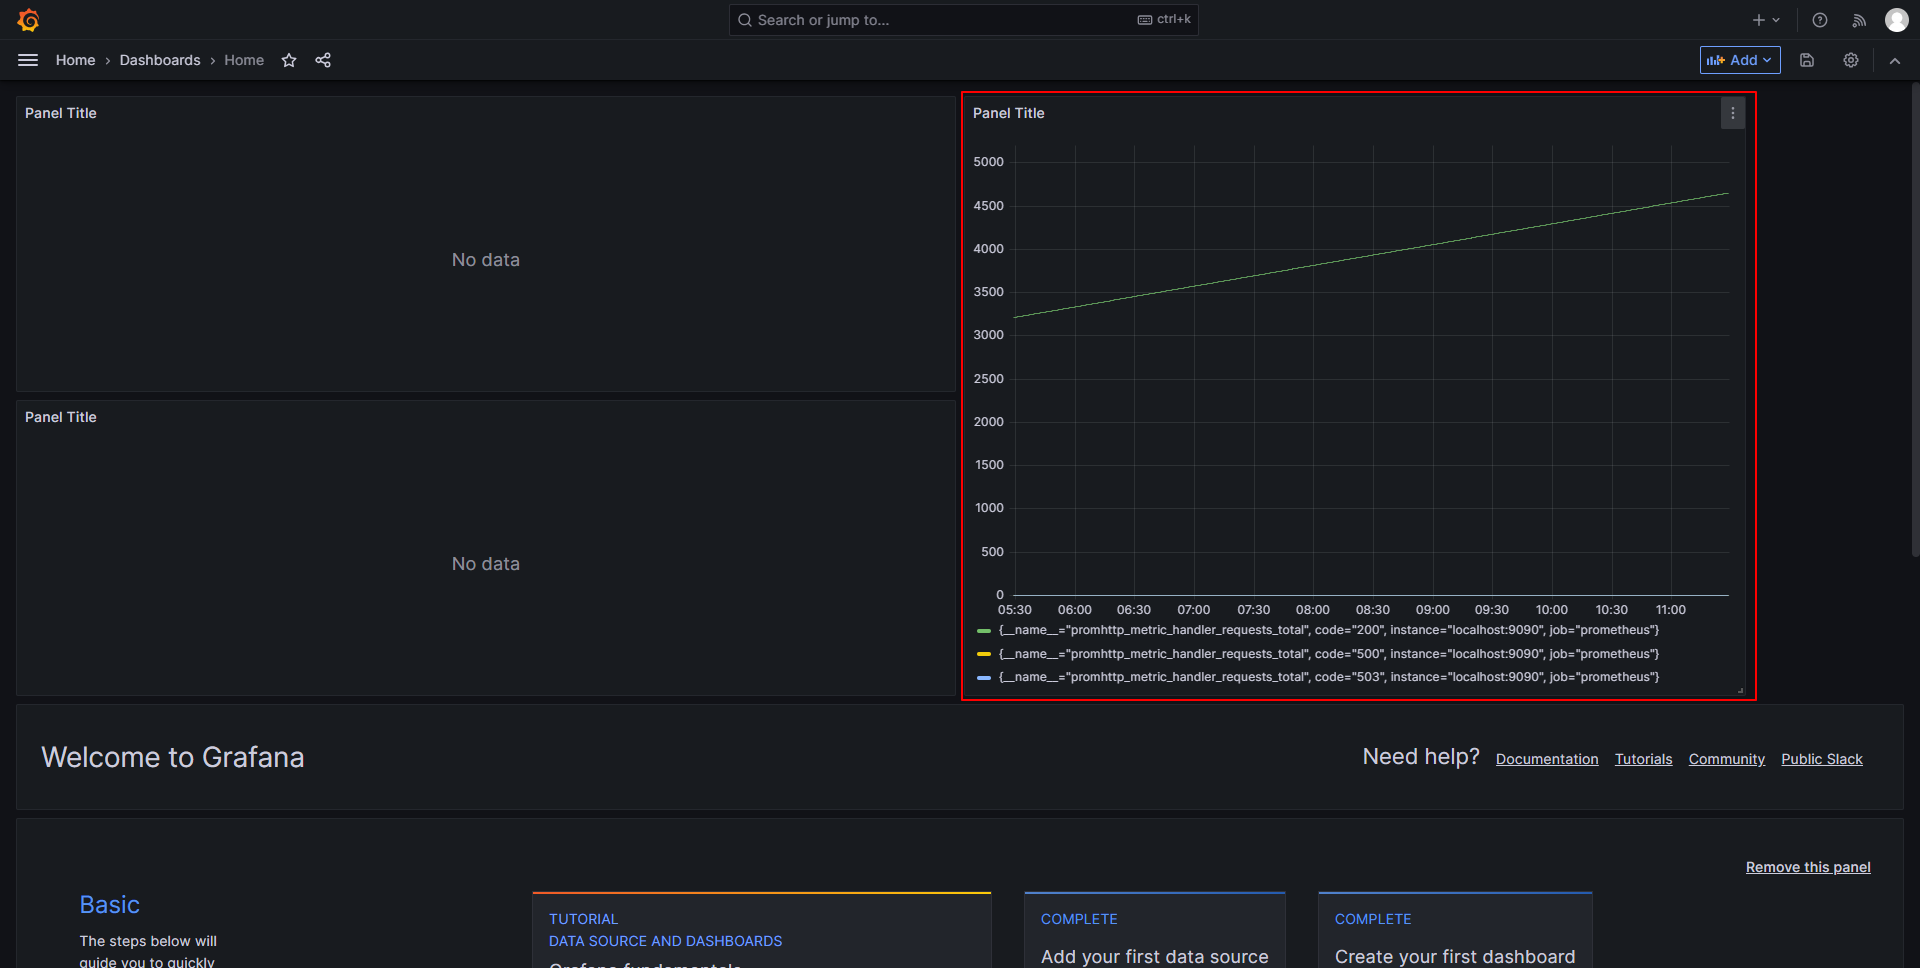
选择监控看板的数据源,监控看板展示通过PromQL查询出的metric数据。下面配置将以Time series的方式展示promhttp_metric_handler_requests_total指标的数据。

在这个DashBoard页面就能看到刚刚配置的时间序列看板。


导入导出DashBoard
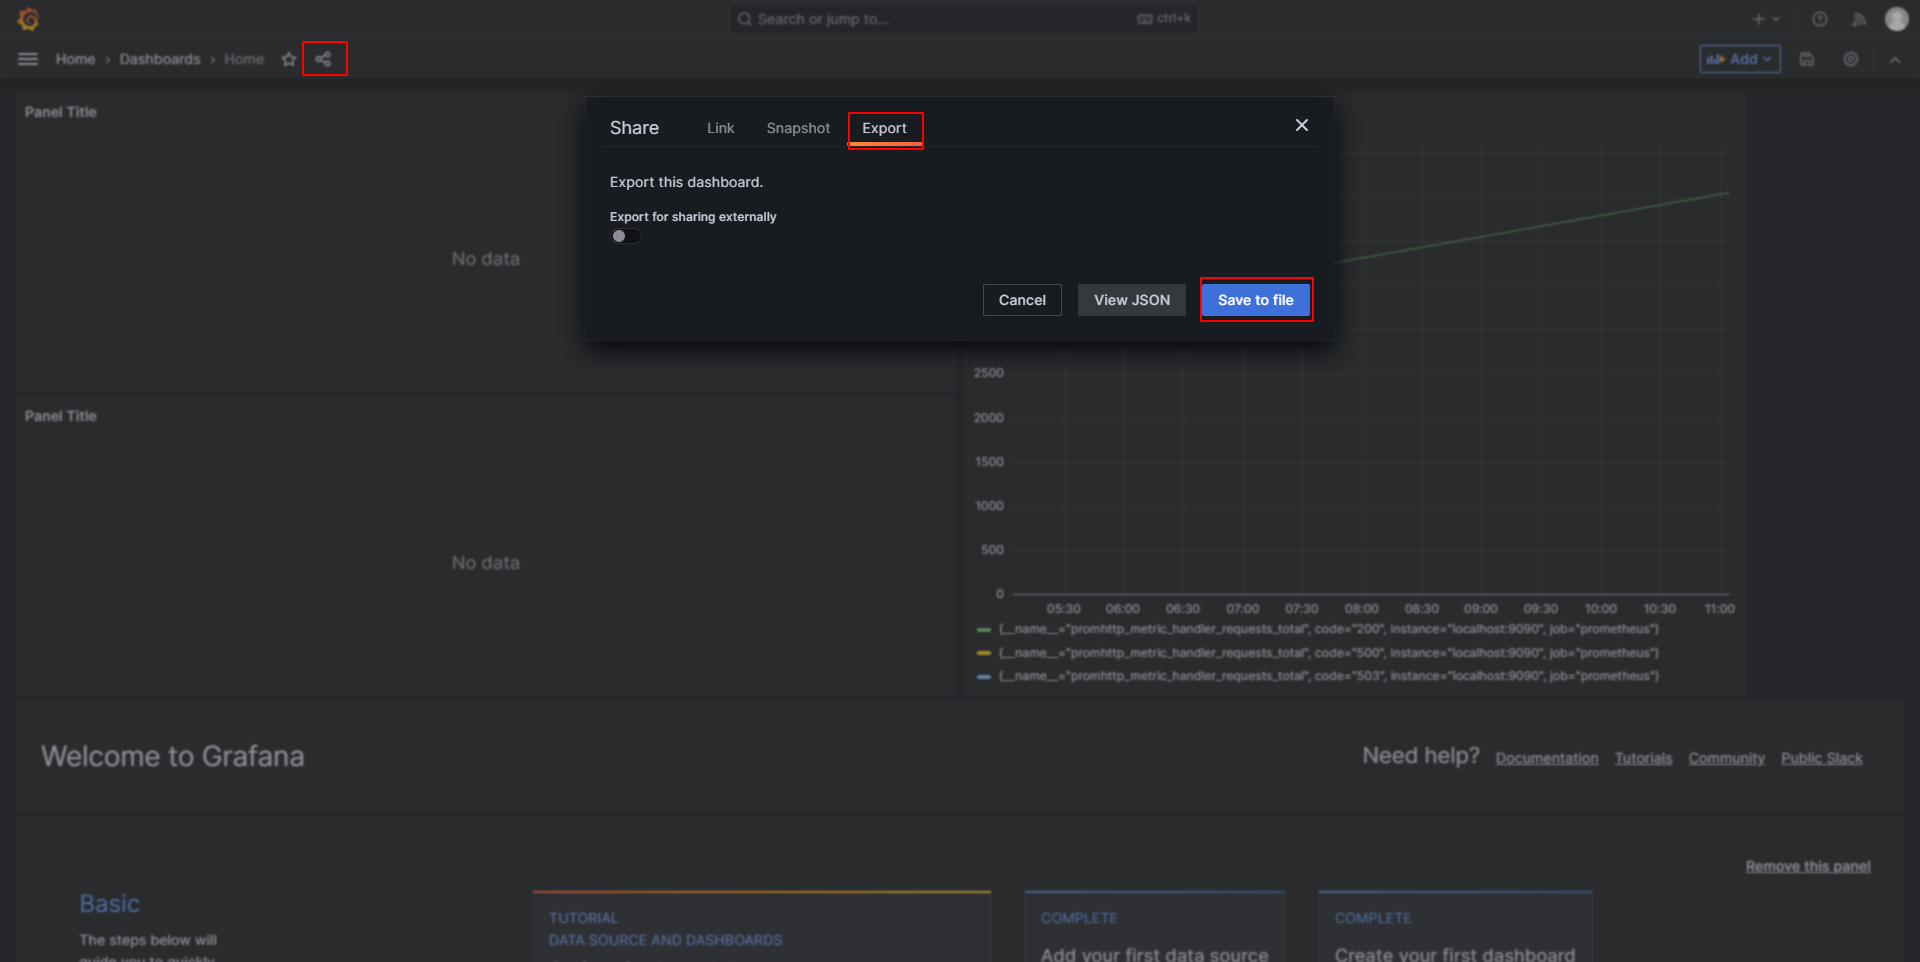
如果监控指标很多,需要配置很多看板,如果有多套Grafana还需重复配置,很麻烦。好消息是我们可以导出配置,并在其他Grafana中导入配置。

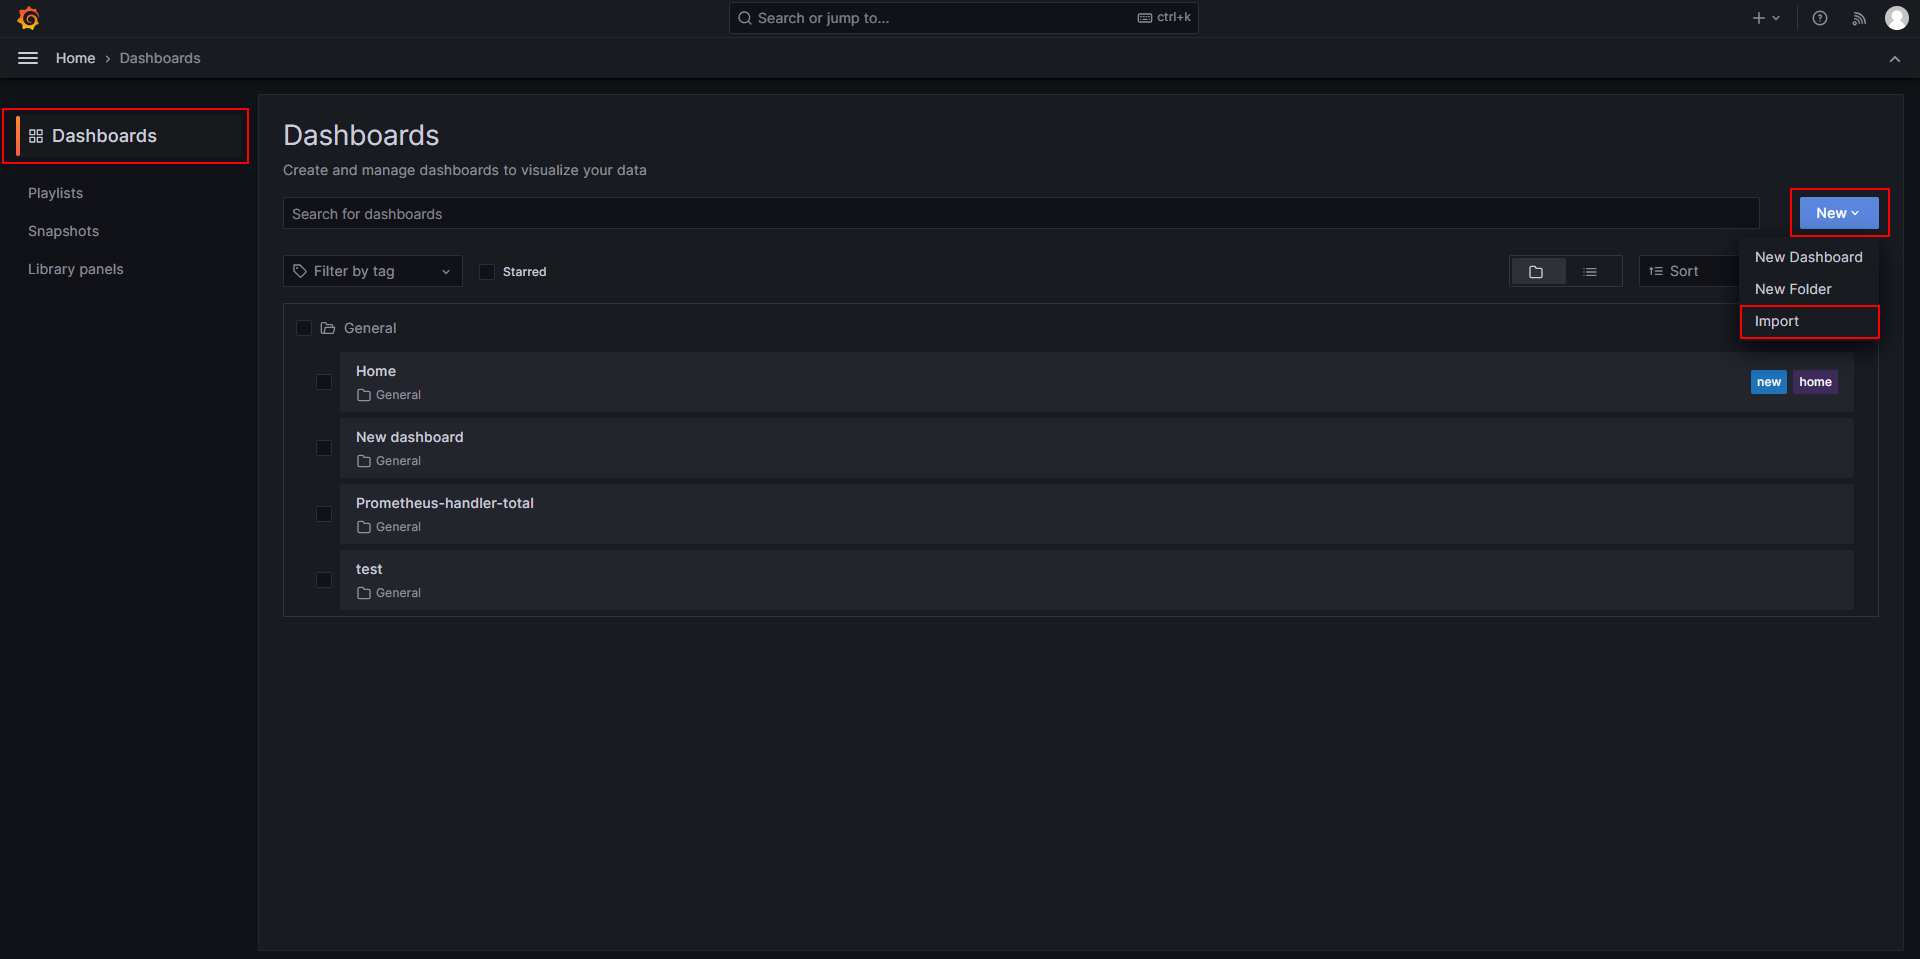
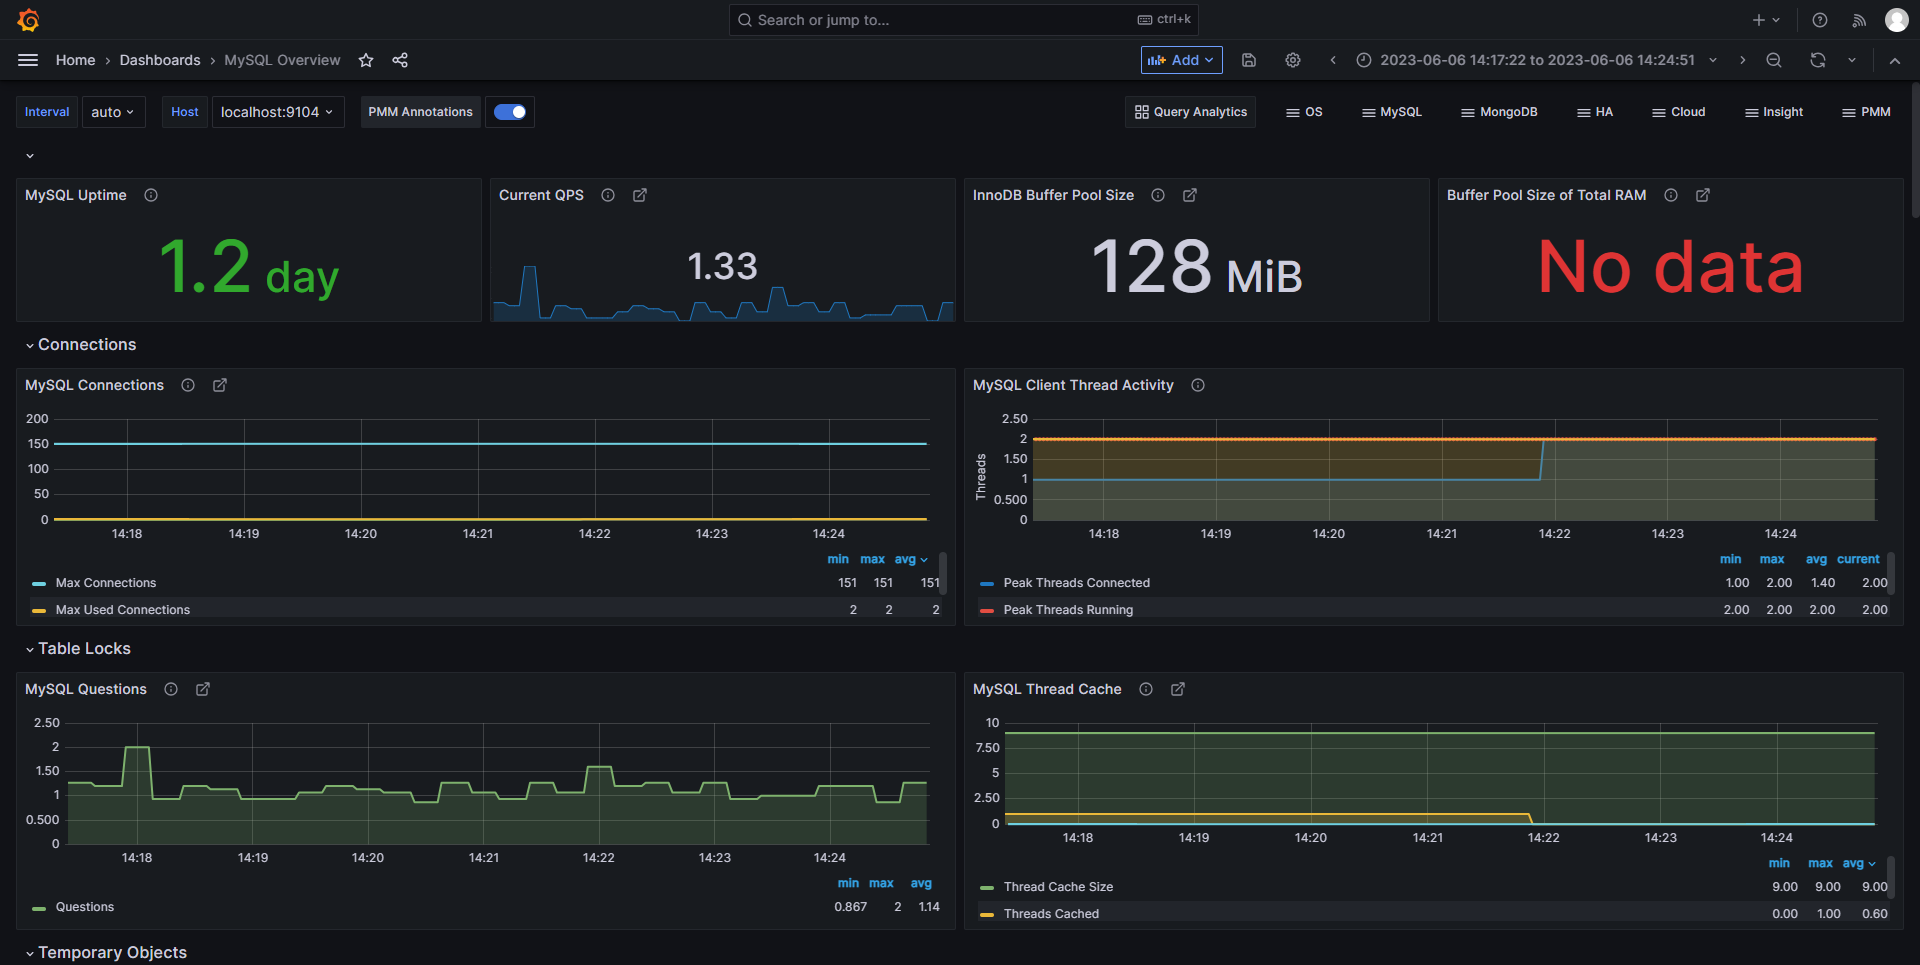
也可以导入配置,像一些常用的如主机监控、MySQL监控、网络监控等等,都有通用的模板可以直接导入使用,而各个云厂商也会为云主机等云产品定制模板,方便使用。
模板下载地址:https://grafana.com/grafana/dashboards/
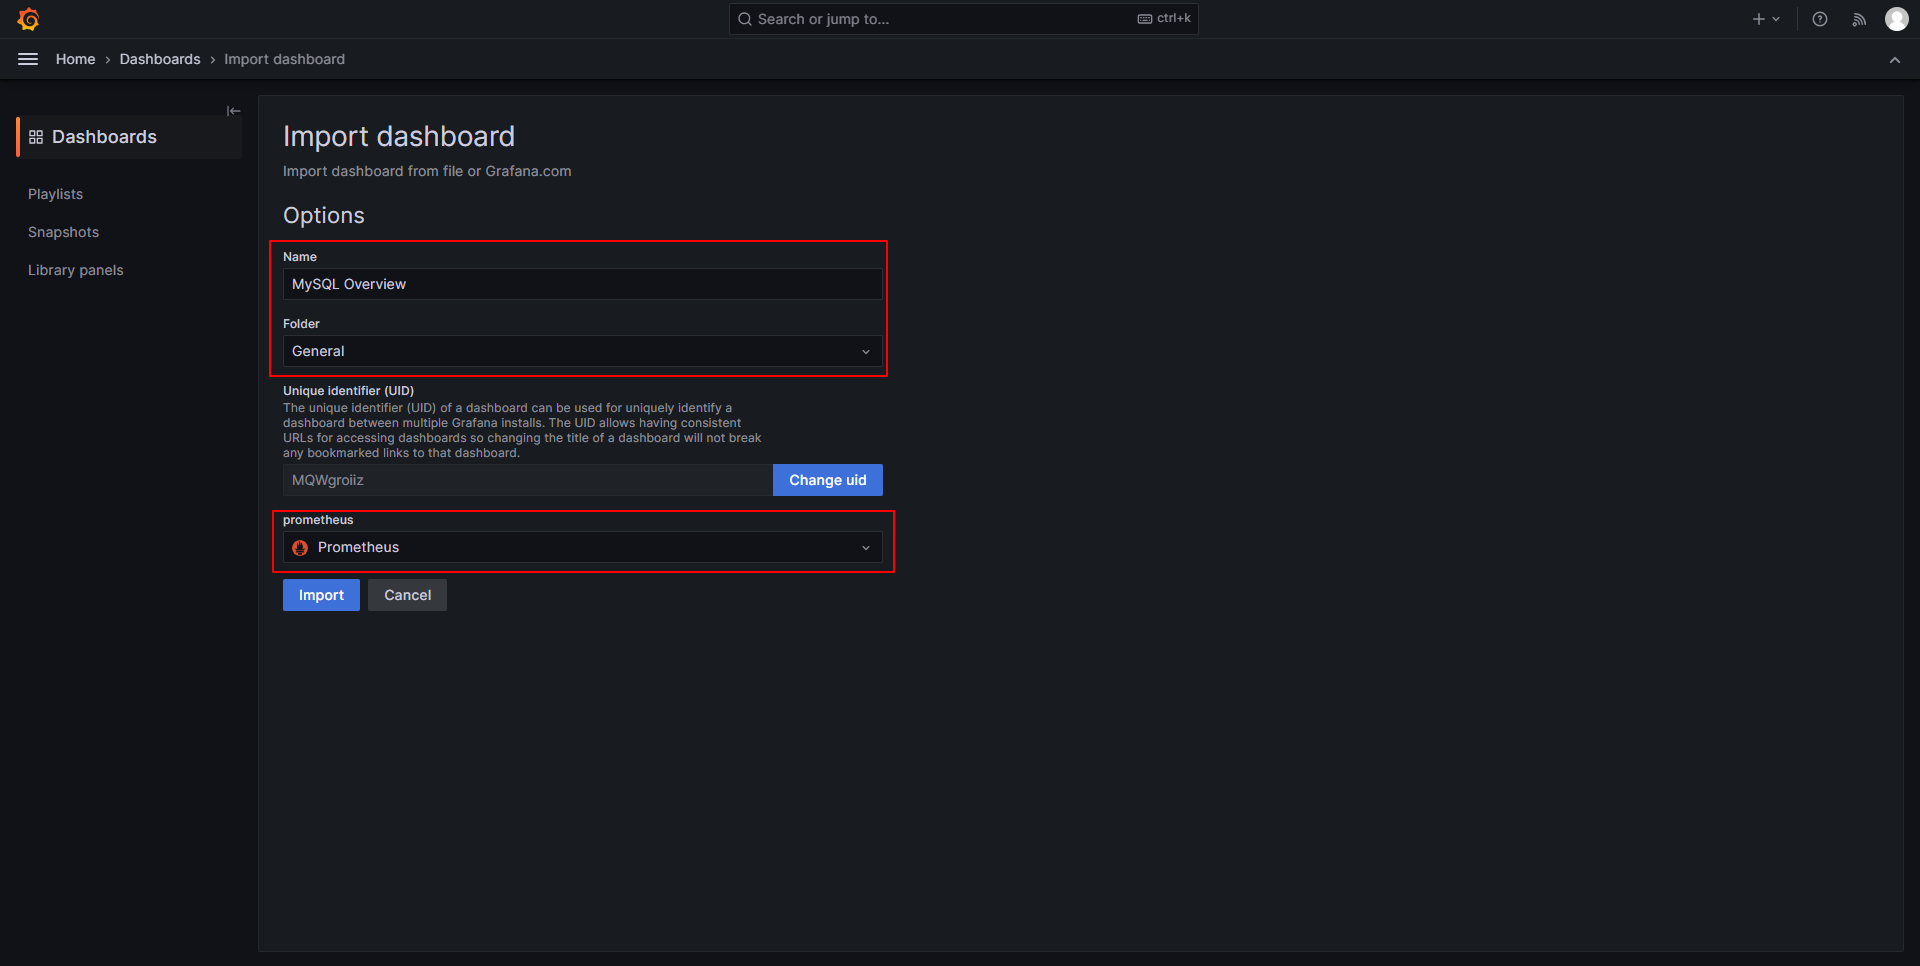
在DashBoards中导入MySQL的监控模板。


配置告警
安装Altermanager
下载地址:https://prometheus.io/download/
配置Altermanager
配置文件为:altermanager.yml,配置示例如下:
 1
 2
 3
 4
 5
 6
 7
 8
 9
10
11
12
13
14
15
16
17
18
19
20
21
22
23
24
25
26
27
28
29
30
31
32
33
34
35
36
37
38
39
40
41
42
43
|
global:
  smtp_smarthost: 'smtp.sina.com:25'
  smtp_from: 'hts_0000@sina.com'
  smtp_auth_username: 'hts_0000@sina.com'
  smtp_auth_password: 'xxxxxxxxxx'  # 使用邮箱的授权码
  smtp_hello: 'sina.com'
  smtp_require_tls: false
route:
  # 这里的标签列表是接收到报警信息后的重新分组标签,
  # 例如,接收到的报警信息里面有许多具有 cluster=A 和 alertname=LatncyHigh 这样的标签的报警信息将会批量被聚合到一个分组里面
  group_by: ['alertname', 'cluster']
  # 当一个新的报警分组被创建后,需要等待至少 group_wait 时间来初始化通知,
  # 这种方式可以确保您能有足够的时间为同一分组来获取多个警报,然后一起触发这个报警信息。
  group_wait: 30s
  # 相同的group之间发送告警通知的时间间隔
  group_interval: 5m
  # 如果一个报警信息已经发送成功了,等待 repeat_interval 时间来重新发送他们,
  # 不同类型告警发送频率需要具体配置
  repeat_interval: 1h
  # 默认的receiver:如果一个报警没有被一个route匹配,则发送给默认的接收器
  receiver: 'web.hook'
  # 上面所有的属性都由所有子路由继承,并且可以在每个子路由上进行覆盖。

  routes:
    - receiver: sina.email
      group_wait: 10s
      match:
        team: node
receivers:
  - name: 'web.hook'
    webhook_configs:
      - url: 'http://127.0.0.1:5001/'

  - name: 'sina.email'
    email_configs:
      - to: 'hts_0000@sina.com'
        send_resolved: true  # 接受告警恢复的通知
inhibit_rules:
  - source_match:
      severity: 'critical'
    target_match:
      severity: 'warning'
    equal: ['alertname', 'dev', 'instance']
|
在Altermanager上面配置了告警路由、告警分组、静默时间、恢复通知、接收者——邮箱信息、接收者——webhook信息等等信息。这些配置指示Altermanager在收到来自Prometheus的告警信息后,如何对告警进行控制。而控制何时告警是在Prometheus中配置的。
在Prometheus的配置文件的增加Altermanager和告警规则的相关配置。
 1
 2
 3
 4
 5
 6
 7
 8
 9
10
11
12
13
14
15
16
17
18
19
20
21
22
23
24
25
26
27
28
29
30
31
32
33
34
35
36
37
38
39
40
41
42
|
# my global config
global:
  scrape_interval: 15s # Set the scrape interval to every 15 seconds. Default is every 1 minute.
  # 配置告警规则计算间隔
  evaluation_interval: 15s # Evaluate rules every 15 seconds. The default is every 1 minute.
  scrape_timeout: 15s
  # scrape_timeout is set to the global default (10s).

# Alertmanager configuration
alerting:
  alertmanagers:
    - static_configs:
        - targets:
          # 配置访问Altermanager的地址
          - localhost:9093

# Load rules once and periodically evaluate them according to the global 'evaluation_interval'.
rule_files:
  # - "first_rules.yml"
  # - "second_rules.yml"
  # 配置告警规则文件路径
  - "rule.yml"

# A scrape configuration containing exactly one endpoint to scrape:
# Here it's Prometheus itself.
scrape_configs:
  # The job name is added as a label `job=<job_name>` to any timeseries scraped from this config.
  - job_name: "prometheus"

    # metrics_path defaults to '/metrics'
    # scheme defaults to 'http'.

    static_configs:
      - targets: ["localhost:9090"]

  - job_name: "mysql"
    static_configs:
      - targets: ["localhost:9104"]

  - job_name: "windows"
    static_configs:
      - targets: ["localhost:9182"]
|
而rule.yml文件里面配置告警规则及触发告警时应该通知那个Altermanager。
 1
 2
 3
 4
 5
 6
 7
 8
 9
10
11
12
13
14
15
16
17
18
19
20
21
22
|
groups:
- name: example
  rules:

  # Alert for any instance that is unreachable for >10s.
  - alert: InstanceDown
    expr: up == 0
    for: 10s
    labels:
      project: demo1
      environment: production
    annotations:
      summary: "Instance {{ $labels.instance }} down"
      description: "{{ $labels.instance }} of job {{ $labels.job }} has been down for more than 5 minutes."

  # Alert for any instance that has a median request latency >1s.
  - alert: APIHighRequestLatency
    expr: api_http_request_latencies_second{quantile="0.5"} > 1
    for: 10m
    annotations:
      summary: "High request latency on {{ $labels.instance }}"
      description: "{{ $labels.instance }} has a median request latency above 1s (current value: {{ $value }}s)"
|
邮件告警
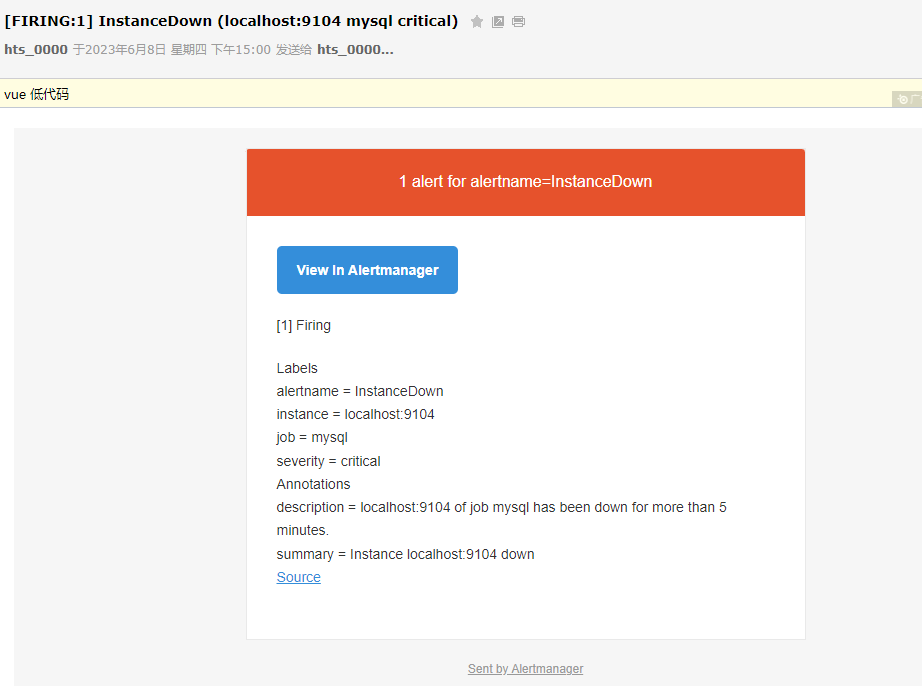
把Mysql Exporter停掉模拟宕机,规则成立时告警信息状态为PENDING,还未触发告警。

当持续10s后,告警信息状态变为FIRING,Altermanager收到告警信息,并发送告警信息到指定邮箱。


钉钉机器人告警
使用webhook功能,可以将告警信息发送到顶顶机器人,顶顶机器人再通知到具体人或群。
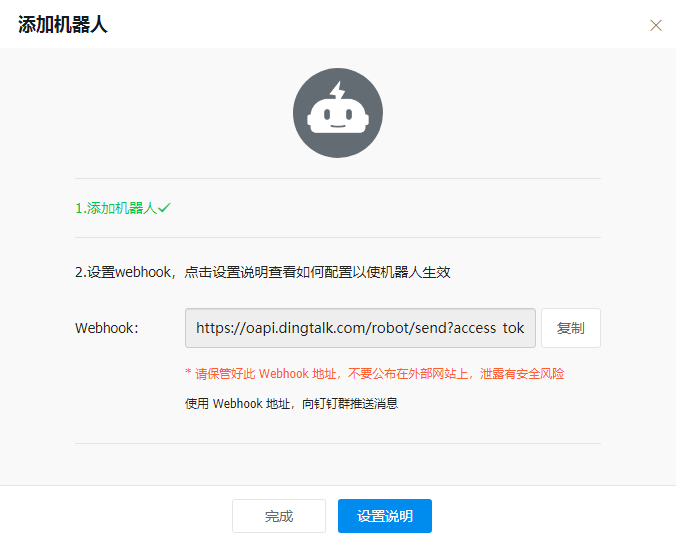
创建机器人。创建时安全设置选择加签选项,记录生成的密钥和生成的url,还需要把url中带上的token取出来。

下载钉钉和企微webhook插件:https://github.com/cnych/promoter
这种插件没有官方的,该插件的文档:https://p8s.io/docs/alertmanager/receiver/
插件的文档:
 1
 2
 3
 4
 5
 6
 7
 8
 9
10
11
12
13
14
15
16
17
18
19
20
21
22
23
24
25
26
27
28
29
30
31
32
|
global:
  prometheus_url: http://localhost:9090
  wechat_api_secret: <secret>
  wechat_api_corp_id: <secret>
  # 配置这两块,token从url中提取一下,secret就是密钥
  dingtalk_api_token: 0d45e829fb1a90f9ec4123bed7f542627dc967b98898a314d08f37b7ae6a7ee1
  dingtalk_api_secret: SECb40c229b6d4220c640aac8052d0f900e7585e4a4882d87a398abc6739f41db72

# 云存储的配置信息,用来存储生成的图片,s3是亚马逊云,但是也支持阿里云
s3:
  access_key: LTAI5t9qFmk1LPxxNU6KrAiy
  secret_key: NdRxYjVpSW1LbscdW68J4FbkH0PcHz
  endpoint: oss-cn-guangzhou.aliyuncs.com
  region: cn-guangzhou
  bucket: sdlifudfh

receivers:
    # 此处的名字要记住,在Prometheus中要用到
  - name: rcv1
    # wechat_configs:
    #   - agent_id: <agent_id>
    #     to_user: "@all"
    #     message_type: markdown
    #     message: '{{ template "wechat.default.message" . }}'
    dingtalk_configs:
      - message_type: markdown
        markdown:
          title: '{{ template "dingtalk.default.title" . }}'
          text: '{{ template "dingtalk.default.content" . }}'
        at:
          atMobiles: [ "123456" ]
          isAtAll: false
|
在Prometheus中加上webhook的配置。
1
2
3
4
5
6
|
receivers:
    - name: 'web.hook'
        webhook_configs:
        # 这里的rcv1就是上面配置的名字
        - url: 'http://localhost:8080/rcv1/send'
            send_resolved: true
|
上面为啥要这样配置,是根据插件来的,也可以自己写一个插件。功能简单来说就是监听等待Prometheus的消息推送,然后再根据配置的钉钉密钥/token等信息,将告警信息转发给钉钉。自己处理的好处在于可以定制告警的内容。
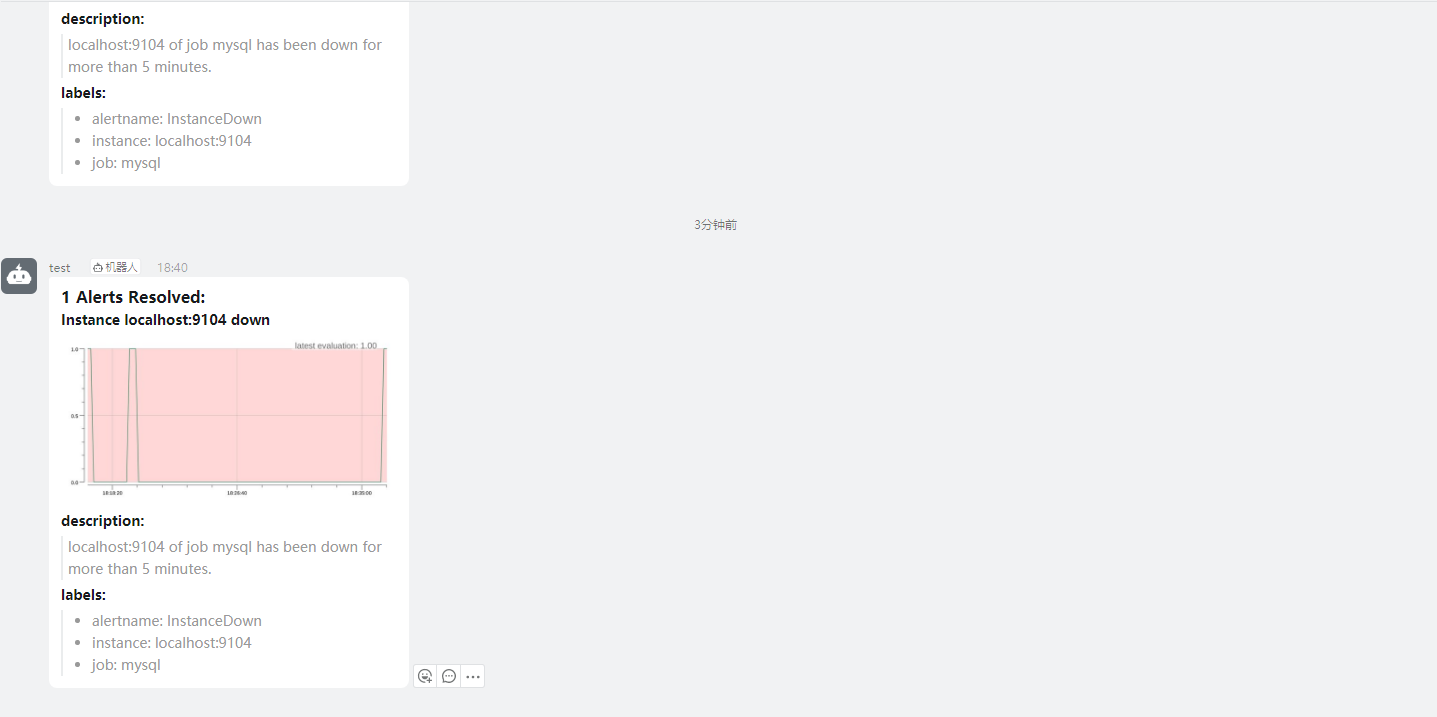
关掉Mysql Exporter触发告警看看钉钉上能否收到。

能显示图片,一个原因是用了云的对象存储,可以实时预览图片。插件定制了转发的内容为markdown格式,钉钉也支持markdown格式的内容。插件调用Prometheus的接口生成告警时的监控图,再将图片上传到对象存储,然后将对象存储生成的文件填入模板中,发送给钉钉,最终呈现的效果就是这样。
